When you open my computer, search opens. How to return My Computer to the Desktop in Windows My Computer opens a search box
By default, the Windows operating system does not display the My Computer icon on the Desktop. For many users, this setting of the operating system is inconvenient for comfortable work.
Since the days of the Windows XP operating system, users have been accustomed to calling this icon "My Computer", although in Windows 7 the icon changed the name to "Computer", and in Windows 8.1 and Windows 10 to "This PC".
Using the My Computer icon (Computer, This Computer), you can open Explorer and quickly get into the management of the Windows operating system by right-clicking on the icon and selecting the appropriate item from the context menu.
In this article, we will discuss how to return the My Computer icon to the Desktop in Windows 7, Windows 8, Windows 8.1 and Windows 10 operating systems.
How to return the Computer icon to the desktop in Windows 7
In the Windows 7 operating system, we will look at three ways to return the system icon to the desktop.
- In order to return the Computer icon to the Desktop in Windows 7, enter the "Start" menu, find the "Computer" menu, right-click on it.
- In the context menu, check the box next to "Display on desktop".
After that, you will see the "Computer" icon on the Desktop.
Method 2, universal for all versions of the Windows operating system:
- Right-click on an empty space on the desktop of your computer. In the context menu that opens, select "Personalization".

- In the Personalization window, click on Change Desktop Icons.

- In the "Desktop Icon Options" window, check the box next to "Computer", and then click on the "OK" button.
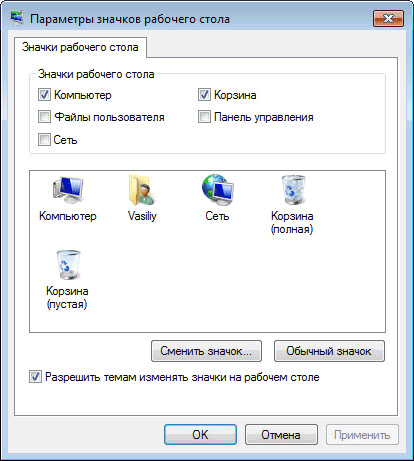
After that, the Computer icon will appear on the desktop.
- If you drag "Computer" from the "Start" menu to the Desktop with the mouse, then in this case you will return the My Computer (Computer) shortcut to the Desktop, and not the system icon.
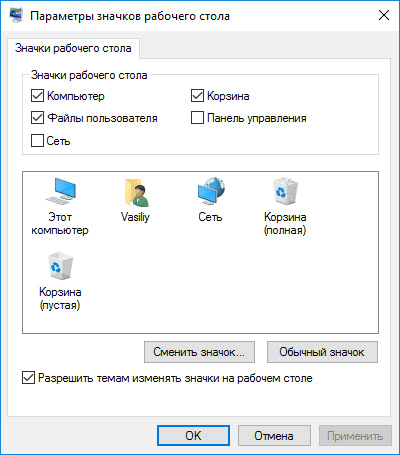
How to return the This PC icon to the desktop in Windows 8.1 or Windows 8
Use personalization settings to return the This PC icon to the desktop in Windows 8.1 or Windows 8.
- After right-clicking on an empty space on the monitor screen, select "Personalize" from the context menu.
- In the "Personalization" window, select "Change Desktop Icons" (similar to Windows 7).
- Check the box next to "Computer" in the "Desktop Icon Settings" window. Save your changes.
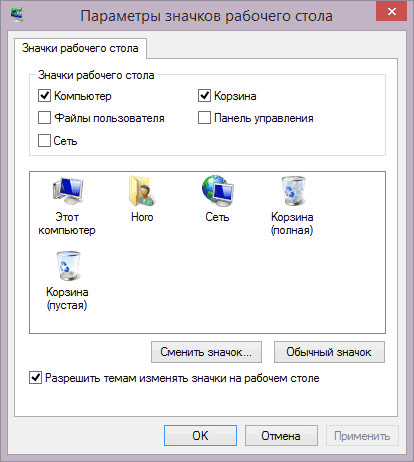
How to get my computer icon back in windows 10
In the Windows 10 operating system, you can return the This PC icon to the desktop through personalization options.
- On the free space of the screen, click on the right mouse button, in the context menu, click on the "Personalization" item.
- In the "Options" window, go to the "Themes" tab, in the "Related Options" section, select "Desktop Icon Options".

- In the "Desktop Icon Settings" window, check the "Computer" item, click on the "OK" button.
The This Computer (My Computer) icon will appear on the Desktop.
Article Conclusions
In the Windows operating system, at default settings, the My Computer icon is not displayed on the Desktop. After changing the settings, the user can return the My Computer icon (This PC, Computer) to the Desktop in Windows 10, Windows 8.1, Windows 7.
When you open a folder, Search opens- probably many had a similar problem and you did not know what to do. In this article, we will analyze in detail what causes it and how to deal with it. Usually, this problem occurs when you install some new program or uninstall an old one and it is not removed correctly.
Also, this problem can be caused by the actions of a virus. The thing is that your Windows registry is damaged and in order to restore the normal functioning of the system you will need to fix it.
Method 1: If you have System Restore enabled, then you need to roll it back to the nearest date when the system functioned normally.
Method 2: For it, we need the Windows command line, to open it, go to Start \ Run and enter cmd (You need to run as administrator). Then enter the following text regsvr32 /i shell32.dll and press enter. Next, restart your computer. If you do not want to do this, download this file and run it on your computer [ Download ]
Method 3: Log in Tools\Folder Options\File Types

2. Find the item "folder with files"

3. Press the button Advanced->Create

4. In the window that opens, in the first line, write open, in the second Explorer.exe /idlist,%I,%L

5. Click OK->Default->OK->Close

Then do the same but only in step 2 you will need to find the Device i.e.
1. Go to Tools\Folder Options\File Types
2. Find Devices
3. Click the Advanced->Create button
4. In the window that opens, in the first line write open, in the second line Explorer.exe /idlist,%I,%L
5. Click OK->Default->OK->Close
Method 4: Check the system for viruses, if the installed antivirus does not find anything, try using another antivirus, for example, the free Cureit utility, you can always download the latest version from here [Download Dr.Web Cureit ]
Method 5: It consists in restoring one of the registry branches responsible for opening folders and drives on the computer. To do this, you need to do the following:
1. Click Start \ Run and enter regedit in the window that opens
2. Go through this path HKEY_CLASSES_ROOT\Directory\shell and right-click on the shell folder and select the delete command.
3. Do the same but only with the branch HKEY_CLASSES_ROOT\Folder\shell
4. Download this file and run it will replace all these branches with default values [ Download
]
Method 6: Just run this file and accept the changes. [ Download ]
Today I came across one computer running windows XP, in which, as they say, "everything was mixed up with horses, people and volleys of thousands of guns." Clicking on My computer we got open Search. Clicking on Local drive C, we open Formatting. Clicking on Control Panel, something else was revealed to us, far from Control Panel. Join our VK group! Under repair! Smart Workshop!
Having driven and tried to reset everything through avz, I made sure that there were no viruses. And the consequences of these things are hardly the result of viruses. These actions did not help anymore.
Anyway. Knowing that the context menu is completely in the registry, I climbed there and still through trial, error, searching in Google and such and such a mother, I won the trouble.
I will not load you where and which bush in the registry we need to remove, how to download it, where to get it, and so on. Let's make it easier.
Below I have attached a file that does 4 things:
1) Deletes a registry branch
3) Deletes a registry branch
Therefore, feel free to download, unzip the site using the password, save it on the desktop. We start, and click on the system's question about the merger OK. All right, let's check the work.
Join our VK group!