Windows 7 recovery disk 64 bit.
It makes sense to use the Windows 7 recovery disc when the OS has experienced a serious failure, as a result of which neither the OS itself nor the troubleshooting menu is loaded when pressing F8 during startup. Therefore, you need to make a recovery disk in advance, using standard Windows tools 7 or third party suggestions. The latter may have even more extensive functionality, so you should also pay attention to the recording of the rescue disk.
How to create a Windows 7 rescue disk
In the OS in question, there is already a way to create a rescue disk that has sufficient functionality to solve most problems associated with booting or abnormal operation of the system. Consider the process in stages:
After a few minutes, the recording will complete and you will have a media with which you can solve most problems with Windows 7.
How to use the rescue disk
To boot using the installation or use the boot disk, you must first configure the BIOS accordingly. In general, the procedure is as follows:

Please note that modern computers and laptops are equipped with a more secure UEFI BIOS. To enter from the rescue disk, you will have to disable Secure Boot for this system. The ways to do this in stationary PCs and laptops are different, so it is better to contact the manufacturers of a particular device for help.
Restoring Windows 7 from disk
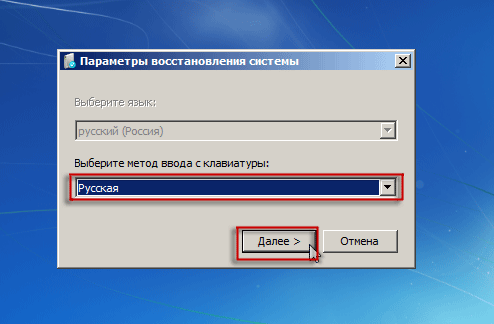
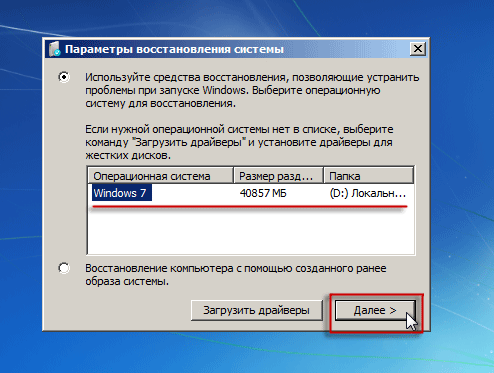
After the restart, the recovery application will open, where the first step is for the user to select the language for working with the program and click "Next". When logging in with installation disk to switch to this mode in the installation window, click on the link "System Restore". After that, you can start working directly with the program:

Using the installation disk, you can usually get rid of many problems, for example, restore the Windows 7 bootloader. If it does not repair automatically, you can use the command line:

Using breakpoints
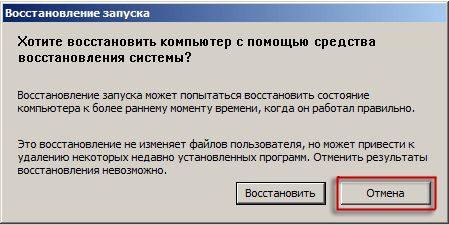
The second item will cause the program to try to return Windows 7 to a previous stable state. Windows 7 provides for the creation of saves of important settings using restore points. The OS tries to create them before any important changes - installing large applications, drivers, etc. To roll back the OS, do the following:

You need to be prepared for the fact that previously installed applications will disappear after a rollback to an earlier configuration and they will have to be installed again. See what installed programs can be lost after a rollback is possible by clicking on the search for affected programs button.
Restoring a system from an image
Not always using the installation disk can make the system work again. Standard Tools recovery disk in this case, they offer to apply the image of Windows 7, the creation of which is the task of the user himself:

You can also select the image yourself, for which select the very last item in the selection window.
If you are not satisfied with the set of recovery tools that the standard Windows 7 boot disk provides, you can run other utilities.
 For example, MSDaRT 6.5 offers a good set of recovery tools for this OS.
Greetings, dear readers.
Computers often fail for a variety of reasons. If this problem is related directly to the operating system, the best solution is to reinstall. But what if there are important files left on the main disk or desktop? After all, when you flash everything will be deleted. The solution is a tool like Windows 7 System Restore from Disk. This function allows you to restore the operating system when the latter refuses to boot.
In addition to a malfunctioning computer, we will also need a Windows boot disk. And it can be both a plastic medium and a flash drive. Moreover, it is desirable that this be the same image from which the current shell was installed. Indeed, otherwise, due to a version mismatch, the process may not go.
If the element from which the current system was installed is lost, try to find it on the Internet on another computer. Download the disk and save it to your hard drive.
After the system image is on one of the partitions, it must be scanned for viruses using Comodo Internet Security, then correctly written to a portable device. To do this, use one of the many programs. For example, I like Rufus. The application allows you to quickly cope with the task. It has an intuitive interface, so anyone can create a disc.
Procedure( )
There are many reasons why Win 7 can crash so much that it stops loading. To solve the problem, you need to use a tool that allows you to return everything to its place. It starts via BIOS:

It is worth noting that some laptop manufacturers even create special software that allows you to quickly restore the device to working capacity. For example, HP offers " recovery manager», Samsung Solution. In general, any large company provides similar functions.
When your PC stops booting from its hard drive, you may find yourself in a stalemate if you haven't created a bootable rescue disk or device.
The recovery disc doesn't just start the PC, it also includes tools to help fix what's wrong with the system. Creating a recovery drive takes minutes.
Recovery disc options for all versions of Windows
There are various ways to create offline, emergency, bootable recovery disks. If using Windows 7 and 8, create good rims recovery is quick and easy. Vista and XP also provide the means to create recovery discs, but the process will take a little more effort.
There are also numerous third-party boot disks - both paid and free - that work with all versions of Windows. The best of them have recovery and return to work capabilities that are far superior to native Windows tools.
Of course, you can boot your PC using the original Windows installation CDs or DVDs, and they provide some basic recovery tools. But most PCs now ship with installation files located in a dedicated partition on the hard drive. Such files will not be available unless you take the time to create a rescue boot disk. In other words, the recovery partition will be useless for you in an emergency in which the PC cannot be booted!
Even if you've taken the trouble to back up your system image, you may still need a rescue disk on hand to restore the most recent image.
In Part 1 (of which there are two) of this article, I'll cover a long series of emergency recovery discs for XP, Vista, Windows 7, and Windows 8. I'll start with the features of Windows 8 and work my way back to XP. I'll also start with the built-in Windows tools and then mention some excellent third party products - most of them are free!
Next week, in part 2, you'll learn how to use these discs to boot your PC and how to get to the recovery tools they contain. I will also share some advanced tips and tricks.
Windows 8: Create Recovery Drive tool
Windows 8.0 and 8.1 both include built-in Recovery Media Creator. This tool allows you to easily make a bootable recovery disk from a flash drive or external USB device. You can also create bootable CDs or DVDs using Windows 8.0 tools.
The standard recovery device (or CD/DVD) from Windows 8 contains a bootable recovery image - a simplified custom version of Windows 8 - that will start the PC. It also includes tools to repair and restore core Windows 8. It may also include tools to reset or update the system based on a system image, such as those provided by computer manufacturers.
If your PC contains a factory-installed recovery image available for use (usually in its own dedicated partition), Recovery Media Creator (RMC) can also add the image to the recovery boot disk. If necessary, you can completely restore your system exclusively from the recovery disc. (You can even put a custom recovery image on a recovery drive. I'll cover that in Part Two.)
The Create Recovery Disc tool is very easy to use. And here's how much:
- While in an administrator account, click Win+W(Windows flag key and W) or swipe to open the Charms panel.

Figure 1. Enter "Creating...".
- Enter Create a recovery drive(recovery drive) in the search field (in Windows 8.0, use the Search, Options (Search, Settings) field), then click the Create a recovery drive icon when it appears. The Recovery Drive tool opens (see Figure 2).
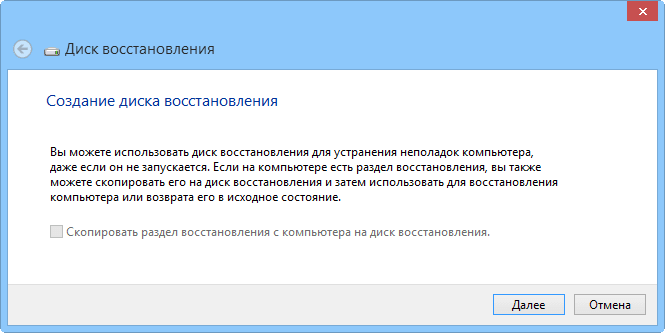
Figure 2. Creating a recovery drive in Windows 8 is a step-by-step wizard that is easy to use.
- If your system has a recovery partition, specify whether you want to include the recovery image on the boot or recovery disk you create.
If the checkbox Copy the recovery partition from the computer to the recovery drive(Copy the recovery partition from the PC to the recovery drive) is displayed in black and responds to clicks, you can burn the recovery image provided by the manufacturer of your PC to the recovery disk. Just check the box to enable this option.
If this checkbox is greyed out and doesn't respond to a click, then you obviously don't have the option to burn the factory image to a recovery drive. However, don't worry, the recovery disc you create will still contain a bootable, stripped-down recovery Windows image 8, as well as a standard array of recovery tools.
- The Create Recovery Disk tool will then tell you how much disk space the recovery files and system image will take up, if its entry is checked. Insert a USB device into your PC that is at least the size you need. Please note that the device can be used only as a bootable recovery disk; everything else on the device will be deleted.
- If you have connected more than one USB device, RMC will show you a list of available devices. Select the one you want to make a recovery disk and click Next. The following dialog box will warn you that everything on the selected USB device will be overwritten. When you're ready, click Create.
- boot image recovery, recovery tools and patches, and the factory image of the system (if selected) will be copied to the recovery drive. This may take several minutes.
- If you chose to copy the factory image, RMC will now give you the option to remove the OEM recovery partition from your hard drive to free up space. Delete or keep the section - you choose.
- Click Close.
- Remove the USB device and store it in a safe place.
For more information on the Create Recovery Disc tool included with Windows 8, visit the Microsoft support page - .
Windows 7: Create System Repair Disc tool
Windows 7 was the first Windows system to come with an automated tool for creating a bootable rescue CD or DVD. The tool doesn't do as much as the Windows 8 version - you can't add an OEM recovery image, for example - but it's just as easy to use. Just a few clicks and your recovery disc is ready!
And here's how much:
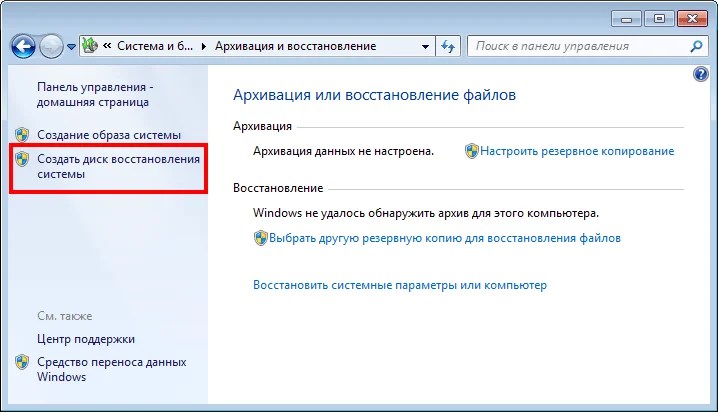
Figure 3. Backup and restore
- Insert a blank CD or DVD into your PC's optical burner.
- While in an administrator account, open the application Backup and Restore (Archiving and restoring). Click Start > Control Panel > System and Security > Backup and Restore(Start > Control Panel > System and Security > Backup and Restore).
- On the left side of the window, click Create System Recovery Disc(Create a system repair disc).
- Confirm if the optical drive is selected correctly. Click Create disc(Create disc) (see Figure 4), and follow the suggested steps.
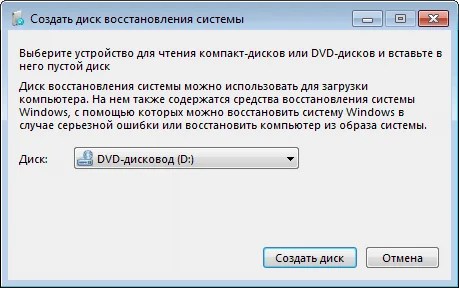
Figure 4: The Create System Repair Disc tool included with Windows 7 lets you create a bootable recovery CD or DVD with just a few clicks
Note: If Windows 7 cannot find the files it needs, it will prompt you to insert the Windows installation disc.
For more information, Microsoft offers a video tutorial on its Windows 7 page.
Vista: Enable and use Create Recovery Disk
The beta version of Vista SP1 came with a great utility Create Recovery Disk (Create a recovery disk) (recdisc.exe) (see figure 5). But for reasons known only to Microsoft, the utility was cut in all manufactured versions. File recdisc.exe still exists in Vista, but it's not functional!
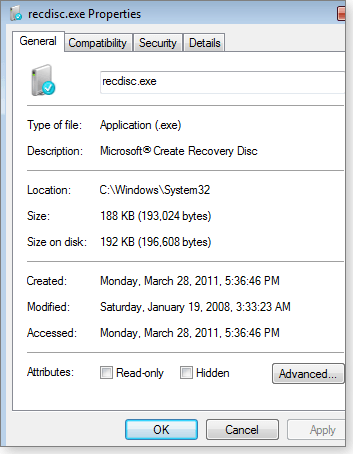
Figure 5. Remaining in Vista, recdisc.exe does not work by default, but with a little effort it can be made useful.
Nevertheless, enthusiasts liked the working version of the utility. So they cooked up the files and made them available for download - along with how-to's. This is not an officially sanctioned solution, but it has been openly discussed and recommended by Microsoft MVP on the Microsoft Answers forum. For example, see the Microsoft Answers topic " " (Creating a System Repair Disc for Windows Vista).
Get recdisk.exe not difficult, but the steps are too long to detail here. A thread on a third party "VistaForums" forum called " " (How to create a Vista recovery disc) has the best how-to instructions I know of. The only thing I would add to practical guide, this is a standard note: before making any system changes, do backup .
If all this is beyond your ability, try using a third party boot disk as described below.
Windows XP: 3rd party tool required
XP does not have the built-in ability to create a bootable rescue disk.
For years, the best alternative has been UBCD4Win(stands for "Ultimate Boot CD for Windows"). But creating that boot disk is a long and complicated process that requires some technical skill and access to a full XP installation CD.
UBCD4Win is still in use, and still free, but I don't recommend it anymore. Now there is a better remedy.
Hiren's BootCD includes an amazing array of free tools - about 100 in total ().
The CD itself is based on Linux, but you don't need to know Linux; The text view application has simple menus for selecting the tools you will launch. (See figure 6.)
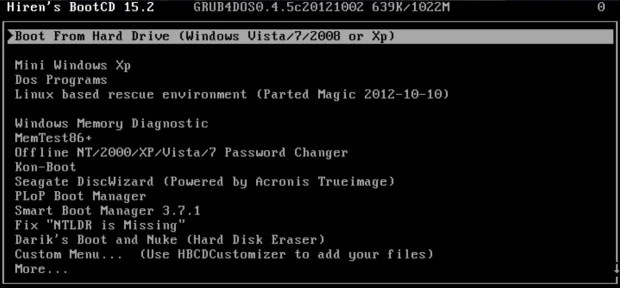
Figure 6. Hiren's BootCD includes an array of approximately 100 free repair and repair software.
Oddly enough, Hiren's BootCD also contains a stripped-down "Mini XP" based on the gray system. It is intended as a disaster recovery tool for use by owners of licensed, paid copies of XP - not as a replacement for purchasing a license or a standard installation of XP. Within its limited scope, it works great. When your regular (licensed and paid) Windows XP system won't boot, MiniXP with Hiren's BootCD can help you get it up and running again.
You can get Hiren's BootCD on his . But finding a working download link can be tricky - the page contains several distracting alternative download links for inappropriate tools.

Figure 7. Actual download link for Hiren's BootCD
All versions of Windows: free recovery discs
If the built-in Windows tools aren't available or don't work for you, there are plenty of free alternative bootable recovery discs. Like Hiren's BootCD, most of them are based on Linux and come with a wide range of preconfigured maintenance and repair tools.
Here are four of the best:
- Trinity Rescue Kit(free or voluntarily paid) - specially designed for recovery operations on Windows machines, but can also be used for Linux recovery issues. Here, a simple keyboard-text menu system is used by default, and a command line is also available in Linux.
- Ultimate Boot CD(free; ) - contains more than 100 easy-to-use repair and diagnostic tools, interface with keyboard and text menu.
- SystemRescueCd(free) - allows the use of basic recovery tools in a hybrid text-graphic Linux environment.
- Ubuntu Rescue Remix(free; , offers a range of open source data recovery and technical forensics tools. However, this product relies almost entirely on the Linux command line, which can make it difficult for people who are used to mouse interfaces .
Automated Easy Recovery Essentials
Tools Easy Recovery Essentials from NeoSmart Technologies deserve a separate discussion. They are favorably mentioned in almost every Internet forum dedicated to restoring Windows.
This is partly because the tools are quite good and can work in all Windows versions- XP, Vista, Win7, Win8, Windows Server.
But the popularity of these tools grew in part because they were free. While many online discussion forums still list NeoSmart drives as free, they are now commercial products. US pricing starts at $20 for Easy Recovery Essentials home edition and ends at $75 for Server edition. You can find a list of all versions and prices for .
For a really modest price, you get a bootable iso image that you can download and burn to a CD, DVD, or USB device. Once launched, Easy Recovery Essentials enables highly automated recovery capabilities. In fact, many complex recovery operations can be launched with one simple click without requiring any further user input.
To get an idea of how easy it is to use these tools, check out the NeoSmart demo video. NeoSmart also offers a money back guarantee.
Which recovery tool is right for you?
I suggest you, if possible, start with the tools available in Windows. They handle most common tasks and maybe everything you need. They provide the performance of familiar operations, as well as a few unusual ones. Hey, you already paid for them!
If the Windows tools don't provide what you need, try free bootable Linux-based recovery discs. Although Linux environment may be unfamiliar to most Windows users - especially command line tools linux strings, - there is usually enough documentation to help you overcome any rough edges.
If neither the built-in Windows tools nor the free Linux-based tools work for you, commercial tools may be ideal. NeoSmart's Easy Recovery Essentials tools in particular work well, are very easy to use, and come with a money-back guarantee.
Next week: you'll learn how to use these recovery discs to boot your computer and access the tools they contain. I will also offer some additional tips and tricks. Stay with us!
Found a typo? Select and press Ctrl + Enter
But there are times when they messed something up themselves or even out of inexperience put a crooked program that broke the whole system.
What to do?
Of course it is desirable to restore everything!
System restore is important Windows feature 7. Therefore, it is not surprising that you can start it in many ways:
In the Start menu - Search, type Recovery and click System Restore
in the Start menu - Search or in the Run window (WIN + R) type rstrui and press the Enter key
in the Backup and Restore control panel item, click Restore system settings or your computer at the bottom, and then click the Start System Restore button
open Control Panel - System - System Protection and click the System Restore button
Whichever way you start System Restore, you will be prompted to select a checkpoint.
If you have created backup image system, you can use it as a restore point.
To see this point, select the Show other restore points check box. In addition, now you can find out which programs will be affected by changes during recovery. Select a restore point and click the button Search for affected programs.
Before proceeding with the restore operation, Windows 7 displays a summary window where the link Finding affected programs also available.

It remains to click the Finish button, and the system recovery process will begin.
If you do not have an installation Windows disk 7, be sure to create a system recovery disc.
Create a System Recovery Disc
Insert a blank CD into the drive. In the Control Panel, open Backup and Restore, then in the left pane, click Create a System Repair Disc. In fact, the disk is created with one click.
You should do this even though you can boot into Windows RE from your hard drive.
If the service partition with Windows RE becomes corrupted, you can boot from the recovery disk and return the system to a point created before the problem occurred.
Well, if everything ... kapets, then you have to set everything up again!
First of all, make sure your computer meets the minimum requirements:
Processor: 1 GHz, 32-bit or 64-bit
RAM: 1 GB (32-bit) / 2 GB (64-bit)
Free disk space: 16 GB (32-bit) / 20 GB (64-bit)
Video adapter: DirectX 9 graphics support, 128 MB memory (to enable the Aero theme)
DVD Reader / USB Flash Drive
Internet connection (for downloading updates)
Installation can be done:
USB flash (flash drive)
Download an image with an operating system, for example, with an installation of Windows 7 or even Windows 8 if you think it's nicer.
You can’t just overwrite the files, because the flash drive will not become bootable. But you can use the program UltraISO.
UltraISO automatically formats the drive to FAT32, so it is not suitable for writing 4GB files. If there is such a file in the image, you will have to use alternative recording methods.
In Windows Vista, 7, 8, right-click on the program icon and select Run as administrator, in XP, double-click.
Click Open and specify the path to the image: Select Bootstrap —> Burn Image hard drive:
Make sure the burning method is USB-HDD+, uncheck Create Boot Partition (UltraISO 9.5 and higher) and click Burn
DVD disc
Download ImgBurn, install, run. Click Write image file to disc, Specify the path to the image, Insert a blank DVD and click. Insert DVD
If the DVD is burned correctly and the boot priority is set correctly, this prompt will appear (you must press any key while it is on the screen)
This is done only 1 time, before starting the installation, during the installation process, just wait 5 seconds and the installation will continue automatically.
Installation start:
Choose language settings
Click the "Install" button:
Reading license agreement if you agree, check the box and click "Next":
Select "Full installation":
Select the desired partition and click "Disk Setup":
Click "Format" (preferably, but not required).
Attention, all data on the selected partition will be deleted!:
Installation continued:
The computer will restart and the installation will continue:

For security purposes, set a password (preferably, but not required):
Enter the key or leave the field blank (you can enter the key and activate later):
Set the security parameters (it is recommended to select the 1st item):
Set the current date and time, select the time zone:
Installation completed!!!
If for some reason your Windows 7 operating system does not boot, then before reinstalling the system, try to restore the boot using the “Recovery Disk” or the OS distribution kit.
In some cases, it helps automatic recovery boot repair (Startup Repair), however I recommend using the manual boot repair using the command line. There was a situation when only the launch of these three commands helped restore normal Windows work 7.
1. Insert the “Recovery Disk” or OC distribution into your CD/DVD drive and restart your computer.

2. When the inscription “ Press any key to boot from CD or DVD” press any key.
3. Select an input method and press the “ Further”.
4. If you have several Windows operating systems installed, then select the one you need, otherwise just click the “ Further”.

5. The check will start, if you have automatic saving of system files enabled (enabled by default), then you can try to roll back the system to the last data save point. But we are not considering this recovery option, so we click the “ Cancel” and get into the “System Recovery Options”.
6. Select the item “ Command line”, where we enter the following commands:

1. Bootrec.exe /FixMbr- This is the MBR recovery command
2. Bootrec.exe /FixBoot- This is the command to restore the bootloader
3. Bootrec.exe /RebuildBcd- This is a command to restore the normal boot of several systems or if there are problems with hard disk partitions
7. After executing the recovery commands, close the command prompt window and click the "Reboot" button. The Windows 7 operating system boot recovery is complete.
P.S. In order to further insure against possible problems with the bootloader, you can backup the BCD storage. This is especially recommended for those who have two or more operating systems on their hard drive. These commands work in the new operating system Windows 8.
Create a copy of the BCD bootloader:
bcdedit /exporte:\boot.bcd
When entering the command, you can specify any partition (letter) on the hard disk or device (flash drive) where the command will save the boot.bcd file.
Restoring a copy of the BCD bootloader: At the command prompt, enter the following command:
bcdedit /importe:\boot.bcd
Accordingly, when restoring the bootloader, you must specify the partition (letter) on which the copy of the file is located. After restoring the BCD bootloader store, restart your computer.
Additional Information:
What is a bootable "Recovery Disk" and why is it needed?
A boot disk (startup disk) is a type of removable media such as a floppy disk, CD, or DVD that contains boot files Windows used by the computer for Windows startup, if system files Windows on the hard drive is corrupted.
The disc contains special recovery tools with which you can restore Windows to working order.


