How to restore windows 7 without a boot disk. Boot files corrupted
To save your computer from constant resets and restarts at boot, you need to restore the operating system (Windows) on the command line.
The Recovery Console contains most of the most requested system commands.
They allow you to fix the problem in a matter of minutes and resume your computer.
First you need to have on hand an installation disk or with the version of Windows that was installed on the PC.
Nowadays, the most commonly used USB-drives.
With the help of a special utility Rufus, we can create such a drive in a couple of clicks.
Like the picture below:
Our installation process will open, you need to wait until all the boot files are unpacked.
After unpacking is completed, the following window will open.
In it, press the key R to open the console.
Now you need to enter the number that corresponds to the desired copy of Windows.
In most cases, only one OS is installed, click on the button 1 .
If you have set a password, you need to enter it and click Ok. Or just click Enter.
This will open the recovery console.
We can write any command of interest to us in a text string.
Their full list can be obtained by writing
Help .
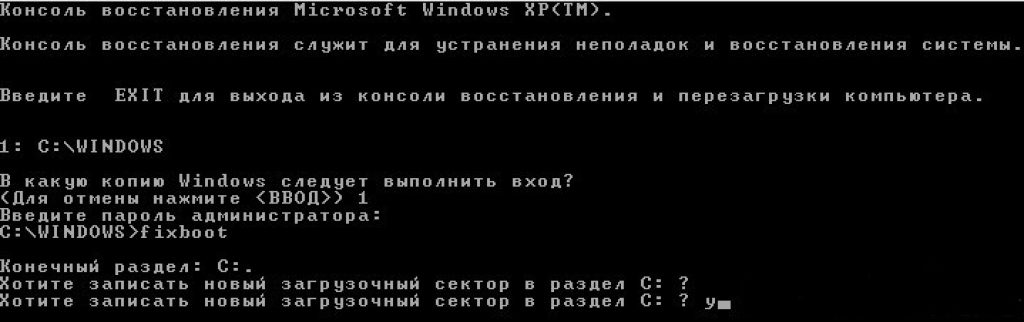
Fixmbr - this command will help restore the boot partition of the system.
To confirm any action, press the Latin letter Y and press Enter.
We write and confirm the command
Fixboot , to start the process of burning the OS to the system drive.
After the process is completed, enter
exit , to close the unnecessary console.
Then we restart the computer.
VIDEO: MBR recovery on Windows XP, all commands in the recovery console
MBR recovery on Windows XP, all commands in the recovery console
Windows 7 Recovery Commands
We will restore our system through safe mode.
When starting the computer, press and hold the F8 .
In rare cases, its function is occupied by a button Delete.
A boot menu will open in front of us, in which we need to select the item "Safe Mode with Command Line Support". As shown in the screenshot below:
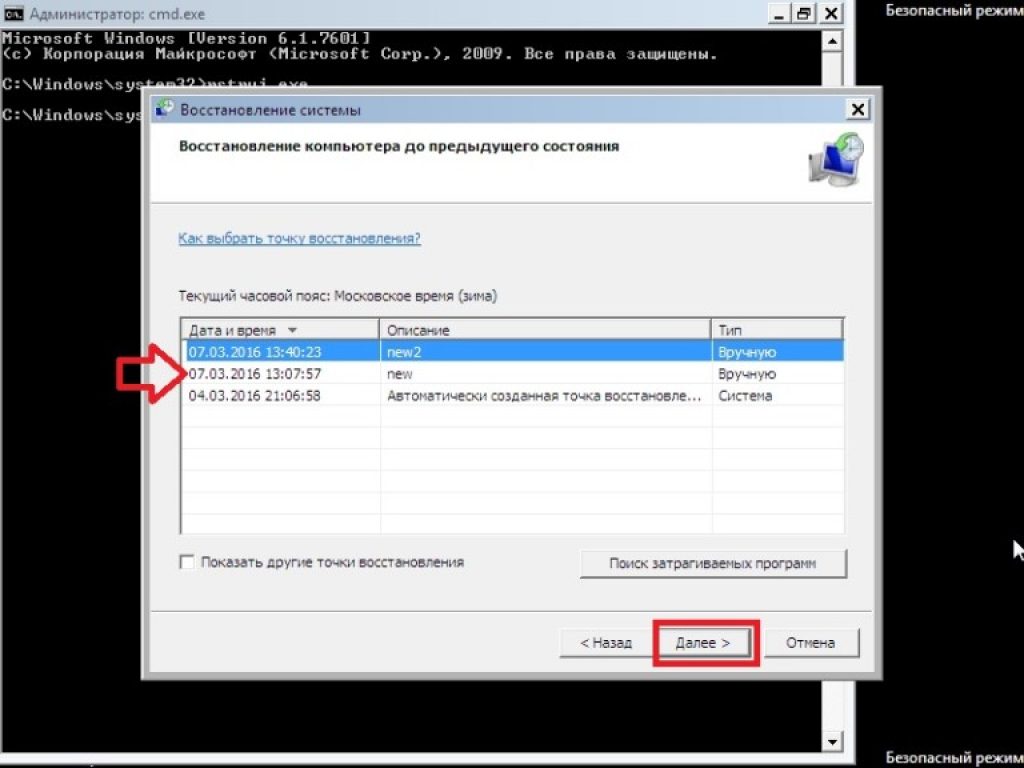
A console will open in front of us, in which we need to write a command
Rstrui.exe
Before us will open "System Restore Wizard».
It displays a list of saved points to which we can roll back the system.
Among them there will be an automatically created point.
Select the point of interest to us and click Further . The recovery process has started.
After that, reload your .
This method works even when the system is badly damaged by viruses. This method can be used if the OS does not boot at all.
Interesting video that will additionally help to understand the problem:
VIDEO: Windows won't boot? Reboot Windows 10, 8 or 7
Windows won't boot? Reboot Windows 10, 8 or 7
During startup, press the key Delete to enter the BIOS subsystem.
Finding a tab « boot» and install our carrier in the first place.
This is done in order to boot the system from it.
While in the BIOS, remember which disk is located in the first place in the "boot" tab. If you have two or more hard disks, then the boot will start from the one on which there is no operating system data. Put in the first place the disk on which you want to install Windows.
Now press the key F10 and click on the button Y in latin keyboard layout.
BIOS configuration saved successfully. After that a window will pop up "Install Wizard"Windowseight".
At the bottom of the screen we find the item "System Restore" and click on it.
In the proposed list, select the desired operating system:
Now let's go to the section "Diagnostics" and enter:
Click on "Automatic Recovery" and wait for the process to complete.
While in the BIOS, remember which disk is located in the first place in the tab "boot". If you have two or more hard disks, then the boot will start from the one on which there is no operating system data. Put in the first place the disk on which you want to install .
Manual troubleshooting
If the automatic mode is powerless, we proceed to the manual elimination of bugs.
To do this, in the Additional options» select tab "Command line".
Let's start with the command line.
To start, enter
Bootrec /FixMbr - to fix the boot record.
Then we write
Bootrec/FixBoot , to fix the new boot sector.
Then we enter
Bootrec/ScanOS . This command will help you find earlier installed versions Windows.
And the last -
Bootrec /RebuildBcd .
It is intended to provide information about installed OS versions in the boot store.
To complete, enter the Latin Y to confirm all our actions.
As a result, you should have a picture like this:
Now you just need to restart your computer for the changes to take effect.
If all previous actions were unsuccessful, then we will use another method.
We launch the console with the help of the Windows + X.
Finding an item "Command Prompt (Admin)" and left-click or Enter.
After that, we create a directory for our copy of Windows.
To do this, in the required field, enter:
Mkdir C:\Imagen-Restaurar and press the key Enter.
After your actions, there will be no visible changes. Don't be scared.
These are the system settings. The console will give you a response after the manipulation is completed.
Leave the computer in peace for 20-30 minutes without performing any additional actions.
When working with the console, never put spaces between words, it is better to replace them with — (hyphen). In cases with spaces, errors and unexpected failures can occur.
When the process is complete, you will see the copy you created, which will be named "WITH:".
Choose the recording path yourself. You will have two options: an external screw or another local drive.
«Imagen-Restaurar»- the name of the created folder in which our image will be stored.
So, after the process is completed, check for the presence of the file in it "CustomRefresh.wim".
If it is not found, then click restart and try again.
In case you set the wrong path, the mounted image must be searched in the folder System32.
This one registers as a starting point for Windows System Restore.
WITHIt is worth creating a restore point when the operating system is in order. In the future, you can roll back the OS to the last restore point at any time.
Starting Windows 10 Recovery Mode
Reboot in safe mode
Before restoring, you need to make sure that there are no malicious files in the system. If a virus attack has damaged Windows, then it is worth conducting a deep scan of the entire computer.
First of all, we restart our PC in safe mode. To do this, open the menu "Start".
We find the item and open it by clicking the left mouse button.
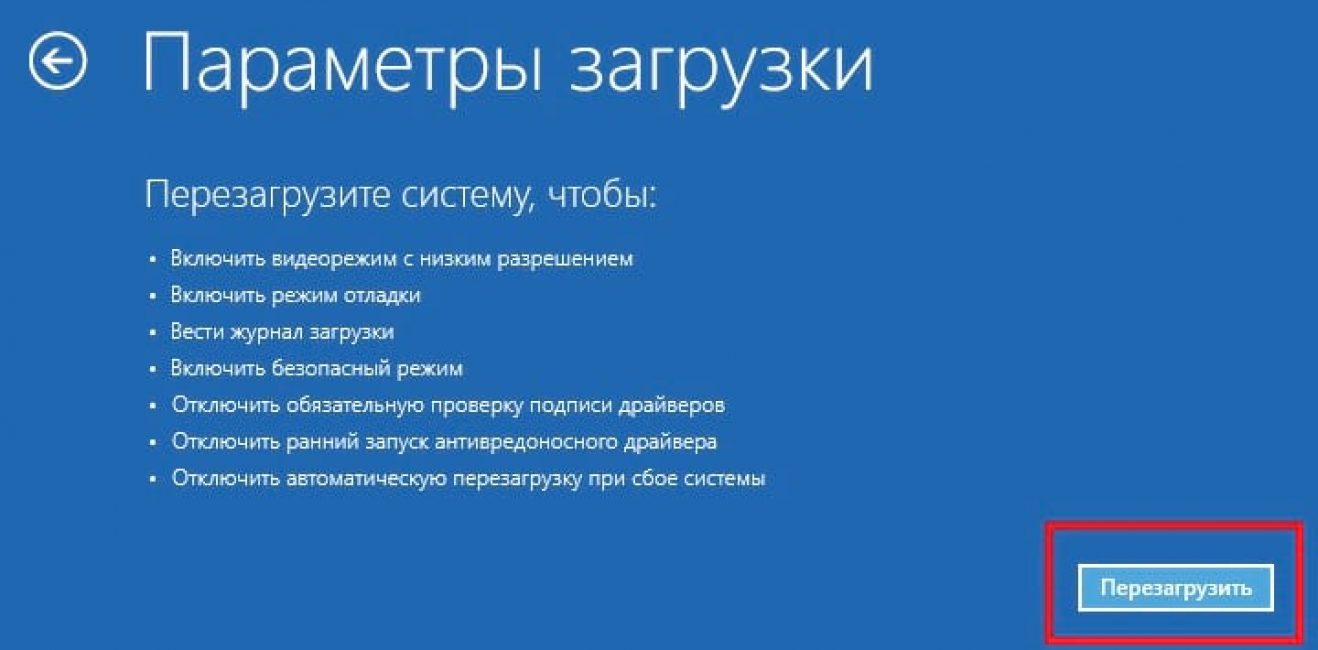
Now we click on "Update and security" → "Recovery" → "Special boot options".
Finding an option "Reboot Now" and choose it.
As a result of this, it will open before you.
This item gives us a choice of three actions, choose a position "Diagnostics".
In the window that opens, select , and finally
From the proposed list of reboot options, we need "Enable safe mode."
Click on the button "Reload".
This mode can also be selected in a short way: go to "Start", hold down the key Shift and click on the action The screenshot describes in detail:
The same function can be set by default through the command line.
First, open it (the above shows exactly how) and enter just one command:
bcdedit /set (default) bootmenupolicy legacy and press Enter.


Hello friends! In today's article, we will re-create the Windows 7 bootloader. In what cases can this be useful.For example, Windows 7 does not boot up and gives errors related to a bootloader malfunction, for example: "An operating system was not found" (The operating system was not found), BOOTMGR is missing. Press ctrl+alt+del, NTLDR is missing when booting Windows 7. Or maybe you transferred Windows 7 from hard drive to the SSD, but the system does not start from the SSD and displays an error or a black screen.You are trying to restore the boot of the operating system, but you are unable to do so.In such cases, you need to delete and then recreate hidden section - System Reserved (Reserved by the system, 100 MB), it is on this partition that the Windows 7 boot files are located.
When installing Windows 7 on a laptop or computer with a regular BIOS ( HDD MBR), a hidden partition System Reserved (Reserved by the system, 100 MB) is automatically created, the purpose of which is to store and protect the boot files of the operating system.This partition always has the following attributes: (Active, System, Primary partition), and it starts the operating system installed on your computer.
If you assign a drive letter to this partition and in the folder options (view) set the options "Show hidden files" and uncheck the option "Hideprotected system files", then inside you will see the "Boot" folder (containing the boot configuration storage file - BCD), and the boot manager file "bootmgr".

For the success of our business, let's remember the Windows 7 boot mechanism and the program will help us BOOTICE. First of all, after turning on the computer, the BIOS subroutine receives control, which checks the functionality of all components. system block, then the BIOS looks in its settings for the boot priority device (hard drive, USB flash drive, DVD drive) and finding one (for example, a hard drive) reads the MBR boot record from it (Windows 7 is usually installed on an MBR partition disk). MBR is located in the first sector boot disk, has a size of 512 bytes, and contains the NT 6.x program code,


called PBR (Partition Boot Record) andhas its own boot record Bootmgr.


After that, control passes
boot manager file "bootmgr", which launches the Windows 7 winload.exe file. What is winload.exe? The operating system (in our case, Windows 7) is a program, and in order for it to work (begin to load), you need to run the OS executable file:winload.exe or winload.efi. WThe loader launches these files. Wloader is a small program. Filewinload.exe starts MBR- loader and filewinload.efi starts the EFI bootloader. Windows 7 in most cases is installed on a disk with an MBR bootloader.
Windows 7 boots up in the following sequence,
download manager bootmgr file processes the available information in the load storage (BCD file), and this is the menu, display time, list operating systems(if there are several) and so on, if the data is correct, then the operating system should be loaded. But! If at least one of the files I mentioned (bootmgr or BCD) turns out to be incorrect or completely absent, then we are guaranteed problems when loading the system.It often happens that the integrity of these files is violated for any reason (careless user actions, installation of third-party boot managers, viruses, etc.), in this case, the standard actions to restore the bootloader may not help, and then it is best to delete this partition completely, then format and re-create the boot files. How can I do that.We delete the hidden partition System Reserved (Reserved by the system, volume 100 MB) and create it again using the built-in systemdiskpart command line utilities
We boot from the Windows 7 installation flash drive. If you do not find the ISO image of the seven, you can use the boot. flash drive Windows 8.1 or Win 10.
In the initial system installation window, open the command line with the keyboard shortcut Shift + F10.

We enter the commands in sequence:
diskpart
lis vol (this command displays letters, numbers, labels, size and file system. BUkva section 100 mb (С:). Volume 1. BUkwa section with installed Windows 7 - (D:).
sel vol 1 ( select the volume with which we will work - 100 mb (C:). Volume 1)
del vol ( delete volume 100 mb).
After deleting the volume, an unallocated area of 100 MB appeared on the disk.
creat par prim ( create a main partition in this unallocated area)
format fs=ntfs ( create an NTFS file system on the partition)
assign letter C ( assign the letter C to the created partition)
activ ( make the section active)
exit (exit diskpart)
bootsect /nt60 C: /mbr (this command writes the necessary PBR codes to the hard disk ( Bootmgr) and MBR (NT 6.x))
bcdboot D:\windows /s C:( create a bootloader for Windows 7, located on (D :),bootloader location (c:))
The download files have been successfully created.


This method is also suitable for those who have several hard drives, and they have an OS installed with a bootloader.
On these discs
we don't usebootrec /fixmbr and bootrec /fixboot toolsto update MBR and PBR codes. These commands only work with hard disk 0.The bootsect command works with the disk we specify. Tthe same goes for bcdboot.Without the /s option, bcdboot works with the active partition on hard disk 0. ANDthe /s parameter we use points to the active partition of the desired hard disk.The windows 7 bootloader stops working for many reasons - if boot.ini is damaged or if you try to install XP along with the Seven, after which the latter does not want to boot. This is due to the fact that XP overwrites the windows 7 MBR boot record. Usually, the windows 7 bootloader is restored using standard system tools. You can also use another tool, such as Bootice.
The easiest way to restore the bootloader
If pressing F8 does not open additional startup methods and the troubleshooter, then you will need to use a windows 7 recovery disk or flash drive. From this drive, you will need to boot the computer into the recovery environment by clicking on the system restore link at the bottom of the OS installation window.

- The computer will automatically try to find a solution to the problem, which will notify you in the window that opens.
- If the recovery utility is up to the task, all that remains is to reboot.

If it was not possible to restore the windows 7 bootloader after XP, use the startup repair tool, which, along with others, is part of installation disk or flash drives. Usually, these simple methods can deal with simple MBR startup problems.

Edit boot.ini
Boot.ini is responsible for starting the system by default. If one of the OSes is installed or removed incorrectly, its non-working record will be stored in the same boot.ini. It is located at the root of the system partition, so to edit it, the computer must be configured to show hidden files.

Sometimes boot.ini can be corrupted by a virus or some program could contribute to it, after which the OS does not start on its own.
The fix is simple - boot from the LiveCD and edit boot.ini with regular notepad. There are only two sections here - boot loader, which controls the boot and operating systems. You should remember the value of several parameters:
- timeout=10 - time in seconds during which the user can select an OS to run;
- multi(0) and disk(0) are parameters that must have zero values;
- rdisk(0) - disk number with the system partition (counted from zero).
In general, boot.ini from one OS should look like the one in the picture.
Using the command line to restore the MBR sector
You can get into command line mode from the same boot disk or flash drive by opening the system restore tool and selecting the very last item "Command line".

- Type the Bootrec command and then press Enter, a complete list of features will appear;
- Write down the MBR sector, for which there is the Bootrec.exe /FixMbr command;
- On the successful completion of the operation after pressing Enter, the computer will notify the user in the next line;
- Next, carry out the procedure for writing a new boot sector, for which enter Bootrec.exe /FixBoot;
- It remains only to enter Exit and try to restart the computer.

- Enter the command line from the installation disk or flash drive;
- Enter Bootrec /ScanOs, after which the utility will scan the computer for an operating system;
- Write the Bootrec.exe /RebuildBcd command in the next line, the program will prompt you to add all found versions of windows to the start menu, including XP, etc .;
- It remains to agree with this by pressing Y and Enter in sequence, after which, when the system boots, you will have a choice of which OS to boot - XP or the seven.

You can fix the problem with the MBR with one more command. To do this, at the command line, enter bootsect /NT60 SYS, then Enter. Enter Exit to exit. As a result, the master boot code will be updated and your systems will appear in the list during boot.
In case of serious problems, it may not be possible to restore the MBR using the described methods, so you should try overwriting the files in the boot storage.
BOOTMGR is missing
Such a message on a black screen is usually displayed by the computer when the MBR sector is damaged or deleted. The reason may not be related to the MBR, for example, if the BIOS has lost the Boot tab settings and the system is trying to boot from the wrong disk. But more often it is the bootloader that is to blame, so we will describe how to restore windows 7 boot.
On a disk with windows 7 there is always a small 100-megabyte reserved hidden partition for writing OS boot files, including a damaged BOOTMGR. You can simply copy BOOTMGR from the installation media and write to this partition. For this:
- Go to the command line from the recovery disk.
- Enter the diskpart and list volume commands in sequence, after which a list of your disks and the letters that the system assigned to each of them will appear on the screen. We are interested in a 100 MB reserved partition and an optical drive - drives C and F, respectively, as in the picture.
- To exit, type Exit and press Enter.

Type the letter of the installation drive followed by a colon and the command to copy bootmrg to the reserved partition. It will look like this:
- F: and then Enter;
- copy bootmgr C:\ and press Enter;
- Exit, the utility will exit.
If copying to the hidden partition fails, the download store can be completely overwritten. Restoring the windows 7 bootloader is done with the bcdboot.exe N:\windows command, where N is the drive letter with the OS. After you are informed that the files were created successfully, you can exit the tool with the Exit command and restart your computer.

- write the diskpart line on the command line, which calls the utility;
- to list all available physical disks write list disk;
- the required disk is selected with the sel disk 0 command, where 0 is the number of the only installed HDD;
- to display all partitions of the hard drive, enter list partition;
- to select a reserved partition, write the sel part 1 command, where 1 is the partition number;
- make it active by typing active;
- Exit the application by writing exit.
In extreme cases, you can completely manually delete and format the system partition by starting from some LiveCD, and then using the bcdboot.exe command to create the sector again.
Using Bootice
If windows XP was installed after the "Seven", due to the overwritten MBR sector, only XP starts up and you do not have the opportunity to select a system after you turn on the computer. However, both systems are fully operational, and you can return the start menu very easily, for which the Bootice utility is used:

In the new Bootice window on the left you will see the OS boot list, in which you will need to add the missing "Seven" to windows XP:
- click "Add";
- in the list that opens, select the line of the new entry windows 7;
- on the right side in the upper input field, select the hard drive;
- in the field below, indicate the section with the "Seven";
- click on save basic settings.

The program will notify you about the successful change of this element in Boot and you can exit Bootice. The next time you turn on the computer, it will already be possible to choose which OS to boot from the hard drive - windows 7 or XP.
recoverit.ru
Windows 7 Boot Recovery
Friends, many of you have had problems loading the operating system more than once and you asked the question of how to restore windows 7 boot and make the operating system boot normally. In this article, we will look at the most common ways to restore the windows 7 bootloader, which help in most cases.
Boot from the installation disk or flash drive from your windows version 7.
If you do not have a suitable flash drive, then it would be time to get one already.
The main thing is that the bitness of the system matches (32-bit or 64-bit). Also, it is desirable that the release coincides (Home, Professional, Ultimate).
Instead of installing, choose System Restore.

Go to the "System Recovery Options" window and select the "Startup Repair" restore tool.

After that, the recovery program will search for errors in the boot sector and the windows 7 boot partition and, if found, will try to fix them. After that, you will need to reboot the system and perhaps windows 7 will boot normally.
If the first time it was not possible to restore the download using the windows 7 recovery tool, then try repeating this process 1-2 more times. This often helps, as the repair tool can't always fix multiple issues in one pass.
2. Restore windows 7 boot using command line
If you were unable to restore windows 7 boot using the automatic repair tool, then try to do it using the command line, it's simple. If your computer is not running as fast as you would like, install SSD drive and you will get a significant performance boost! ASP900S3 75E120BW F120GBLSB
Boot from the installation disk or flash drive with your version of windows 7 and select "System Restore" instead of installing.
Go to the "System Recovery Options" window and select the "Command Prompt" recovery tool.

After that, a window with a black background will appear in which you will need to write several commands.

Enter the following commands in turn:
| bootrec /fixmbr |
| bootrec /fixboot |
| bootsect /nt60 ALL /force /mbr |
| exit |
Switching the language is done by pressing Alt+Shift. After entering each command (line), you need to press the "Enter" key.
Then restart your computer.

After that, in most cases, the problems associated with the boot sector and the windows 7 bootloader will disappear and the operating system will boot normally.
If after using the command line, windows 7 still does not boot, then try again using the automatic boot repair tool, as we discussed above.
3. Windows 7 boot recovery with system reinstallation
If you were unable to restore the boot of the operating system using the methods described above, then most likely you will have to reinstall windows 7 with deleting partitions.
Before reinstalling windows 7, copy all the files that are important to you from your hard drive to an external drive or USB flash drive. This can be done using any bootable LiveCD. Please note that an external drive or flash drive must be connected to the PC before booting from the LiveCD, otherwise it may not be detected.
Transcend TS1TSJ25M3
If, due to boot errors, you are unable to reinstall windows 7, then delete all partitions from the disk using a third-party utility, such as the Acronis Disk Director boot disk. After that, try again to install windows 7 with the creation of new partitions.

If, when reinstalling windows 7 at the disk setup stage (creating partitions, selecting a partition for installation) or when you restart the computer during the installation process, you experience the same boot errors, then start the command line and run the commands that we discussed above.
The command line at the stage of disk configuration can be launched using the key combination "Shift" + "F10".
If you have other problems with the installation:
- windows does not see the disk
- Can't install windows to this drive
- Selected disk has GPT partition style
read our articles about installing windows 7, windows 8.1 and windows 10. There are also tips on partitioning a disk and the nuances of installing windows on large disks (3 TB or more).
4. Causes of problems with loading windows
The most common causes of windows boot failure are:
- Hard disk and power failures
- Errors when installing multiple operating systems
- Errors when using disk utilities
- Incorrect activators
- Installing windows on an existing partition with a bootloader
In order to prevent problems with loading in the future, you need to determine what exactly led to the problem and not repeat these errors.
If you have found another reason that caused the problem with loading windows, or another way to fix the problem, please write about it in the comments.
ASP900S3 75E120BW F120GBLSB SSDSC2BW240H601 75E250BW SSDSC2BW240A4K5 7KE256BW
ironfriends.com
How to restore windows 7 startup via command line
Repair tools windows errors constantly improving, offering users more and more automated solutions to quickly resolve various problems. If you connect installation media to your computer and select Startup Repair in the System Restore section, you can fix many errors that prevent windows from starting. However, if the bootloader is damaged, this method will not work, so if you encounter such a problem, you will have to restore the MBR through the command line.
Command line launch
You will need a boot disk with a distribution kit of the same system that is installed on the computer. Not only the version must match, but also the bit depth of Windows, otherwise the recovery will not work.

After opening the list of available tools, first fix launch errors. If you can't resolve the bootloader corruption issue, return to the list of tools again and select Command Prompt.
Bootrec utility
To overwrite the MBR (data required to boot Windows) and fix bootloader errors, we will use the utility built into windows. Enter the command "bootrec" in the interpreter window. After running this utility, a list of supported commands will appear - run them in order. 

Restart your computer. The bootloader repair is done, the MBR is overwritten, so Windows should start without problems. If overwriting the MBR did not resolve the startup issue, try the remaining two commands:

The utility will start scanning your hard drive, trying to find installed systems. When windows 7 is detected, run "Bootrec.exe /RebuildBcd". The systems found will be written to the boot menu. Exit the utility using the "exit" command and restart your computer. You no longer need to overwrite the MBR - Windows will start without errors.
BCDboot utility
If you can't fix the MBR error, try repairing the bootloader using the BCDboot utility. This tool allows you to create or restore a boot environment located on the active partition of the hard drive. If, as a result of a system failure, the boot environment was moved to another partition of the hard disk, then using BCDboot.exe you will return it to its place.
Open a command prompt and type "bcdboot.exe e:\windows" (attributes are optional). Instead of "E:" you need to put the letter of the partition on which the Windows files are stored. If in windows environment this section is marked with the letter "C", then here it can be displayed as "D" - keep this in mind when executing the command. 
After the operation is completed, restart your computer and try to start windows again. The corrupted boot environment will be repaired and the system will start without errors.
recoverit.ru
How to restore bootloader windows 7 and windows 8

What is the windows bootloader? In the simplest language, this is a program that ensures that the operating system is loaded immediately after turning on the computer. If we consider the evolution of windows operating systems, then in windows 2000 and windows XP, the windows loader was NTLDR (NT Loader), which can load other operating systems by setting the appropriate boot sector in a separate file. But with the advent of the new BIOS system - EFI and UEFI - the old NTLDR no longer met the requirements. From windows Vista onwards, windows 7, windows 8 and windows 8.1 began to use a new boot manager (boot manager) - BOOTMGR. Its work is closely related to the Master Boot Record (MBR) or the Master Boot Sector (MBS). When the computer boots, after checking the hardware, the BIOS reads the first sector - 512 bytes of data - from the boot hard disk. An MBR can take up more than one sector, but that's not the point here. The MBR contains the code for the primary bootloader and the hard disk partition table.
In case of damage to the bootloader or boot record, your operating system - be it windows 7, windows 8 or windows 8.1 - will give the BOOTMGR is missing - press CTRL+ATL+DEL to restart error.
In some cases, the BOOTMGR is corrupt error is generated. The system cannot boot:
In this case, you will no longer be able to start the windows operating system in normal mode.
Note: First of all, before resorting to drastic actions, check if the hard drive boot sequence is simply set incorrectly, or the BIOS settings were simply reset to default (this happens when the CR2032 battery on the motherboard runs out). This is especially common on computers with 2 or more hard drives installed. You just need to go into the computer's BIOS and check which one is set to boot. To do this, when loading, when the primary diagnostics of the hardware is in progress (white letters on a black background), press the Delete button several times. The BIOS screen should open. We are looking for the item “Hard Disk Boot Priority” or simply “Boot Device Priority” in the BIOS sections and select it:

Before you change something, you need to know on which of the disks the operating system is installed. If you do not know - put each of the hard drives in turn first, press the F10 button to save and try to boot. The main thing is to remember which disk was first at first and, if the sequence change does not bring results, return everything as it was.
How to restore windows bootloader.
There are two recovery methods: using standard means from Microsoft and with the help of third-party programs. In the first option, you will need a boot disk or flash drive with the original windows 7 or windows 8 image. A third-party windows assembly may not be suitable, since on many assemblies everything starts immediately from the start of the installation of the operating system. In the case of using third-party programs, the Hiren's Boot CD is suitable for you.
Restoring the bootloader using Microsoft tools.
Method for windows 8 and windows 8.1
Step 1. We restart the computer, press the Delete button at boot and get into the BIOS. In the “Boot Device Priority” section, you need to set the CDROM value in the case of a disk or USB in the case of using a bootable USB flash drive.

Step 2. When booting from the disk, the Install windows window should open:

At the very bottom, select "System Restore". The hard drives will be checked and a list of available operating systems will be displayed. Often there is one item on the list, and you need to select it:

The Select Action window opens:

Click on the "Diagnostics" icon - the section menu will open:

Select the item "Advanced options".
Step 3. Select the item "Automatic recovery":

The system diagnostics will start. If any error is found, you will be shown a message about it. Then you will need to click the Fix button and wait for the fix to finish and restart the computer.
Step 4. If automatic recovery did not reveal problems during diagnostics or did not help, and at startup, windows 8 still does not load and the error “Bootmgr is Missing” appears, then boot from the disk again and in the “Advanced Options” section of the diagnostics, select the item "Command line":

The windows 8 or windows 8.1 command prompt will open.
Step 5. In the Windows 8 Command Prompt, enter the command: bootrec.exe / FixMbr Press Enter. The "/FixMbr" key is used to write to the system partition a master boot record that is compatible with windows 8 and windows 8.1. This option does not overwrite the existing partition table. Then we enter the command:
bootrec.exe /FixBoot
And press Enter again.
The "/FixBoot" key is used to write a new boot sector to the system partition using a boot sector compatible with windows 8 and windows 8.1.

We restart the computer and check the loading of windows 8.
Step 6. If after rebooting the error “BOOTMGR is missing - Press Ctrl+Alt+Del to restart” has not been resolved, run the command line again, where we type the command bootrec.exe /RebuildBcd The “/RebuildBcd” key is used to completely rebuild the configuration data. The result of executing the program with this key will be to scan the hard drive for the presence of the windows operating system and request to add it to the boot list.

Click - Yes (Y) and restart the computer and check.
After the above operations, it is usually possible to restore the windows 8 and windows 8.1 bootloader. If the above methods did not help, then you need to try to restore the download using third-party programs. And if they don’t help either, reinstall windows 8, since most likely nothing else will help.
Method for windows 7.
Step 1. We restart the computer, press the Delete button at boot and get into the BIOS. In the “Boot Device Priority” section, you must set the value to “CDROM” in the case of a disk or USB in the case of using a bootable flash drive.
You need to set the "1st Boot Device" parameter to "CDROM" (or USB-HDD for a flash drive). Press F10 to save the BIOS configuration. We restart the computer.
Step 2. When booting from a disk, you will see the following window to start installing windows 7:

Here you need to select the item "System Restore". After checking the hard drives, you will be shown a list of available operating systems:

As a rule, there is only one system in the list, although there are users who have 2, 3 or even more operating systems on the screw. But this is less common. Click the Next button and the System Recovery Options window opens.

Step 3. Select the item "Startup Repair". The system will be diagnosed. If an error is found, you will see a message:
You will need to click the "Fix and restart" button. After that, the system should boot in normal mode.
Step 4. If, after a reboot, the normal loading of windows 7 has not been restored or no problems have been identified during system diagnostics:

Then you need to select the "Command Prompt" item in the "Recovery Options" window of the system:

Step 5. In the windows command line, enter the bootrec.exe /FixMbr command and press Enter. Then we enter the bootrec.exe /FixBoot command and press Enter. I already wrote about what the /FixMbr and /FixBoot keys mean above.
We restart the computer and check.
Step 6. If, after restarting the computer, the bootloader did not recover and the BOOTMGR is missing error did not disappear, start the command line again and type the command: bootrec.exe /RebuildBcd
The "/RebuildBcd" switch searches for installed operating systems that are compatible with windows 7 and will perform a complete rebuild of the boot configuration data. The result of the program will be scanning the hard disk for the presence of the windows operating system and a request to add it to the boot list. Press - Yes (Y) and restart the computer.
Step 7. If the windows 7 boot error has not been resolved, then there is another way from Microsoft - the BCDBoot utility, which is used to create a system partition or restore the boot environment located in the system partition. On the command line, you need to type the command:
bcdboot.exe c:\windows (If you have windows installed on another drive, correct the path in the command, for example, to d:\windows).
The result will be the message "Boot file successfully created". We restart the computer and check.
Restoring windows to boot normally with Hiren's Boot CD.
Unfortunately, there is not always an original boot windows disk 7 or windows 8 is at hand, and downloading it from the Internet can be very problematic. In this case, various small boot assemblies usually come to the rescue - the so-called liveCD, which can also be written to a disk or USB flash drive. In my opinion, the most optimal, convenient and easy service set of programs for restoring the windows 7 or windows 8 operating system is Hiren's Boot CD. There are a lot of utilities for restoring the windows bootloader on the disk, so I will show those that system administrators most often use: the Paragon Hard Disk Manager graphical program and the MBRfix console utility. First you need to download "Hiren's Boot CD", burn it to a flash drive or CD and set the BIOS to boot from CDROM or USB-HDD, depending on whether you are booting from a disk or flash drive.
If everything is done correctly, you will see the Hiren's Boot CD start menu:

Option 1. Paragon Hard Disk Manager.
To launch the program "Paragon Hard Disk Manager" you need to select the item "DOS programs" or "Run DOS programs (alternative method)", and then the subsection "Disk Partition Tools" and, accordingly, the item "Paragon Hard Disk Manager" .
Now you need to select the menu item "Wizards" \u003d\u003e "Windows Boot Recovery" in the main program window:

The "Windows Boot Recovery" menu will open:

Select the first item - "Search for installed copies of windows" and click the Next button.

The program scans disks and displays a list of operating systems, which usually has only one item. Check the "Change boot entry" checkbox and click Next.

Paragon Hard Disk Manager will overwrite the boot record (MBR). Click the Finish button and restart your computer.
Option 2. MBRFix utility.
To run the MBRFix utility, select the "Mini windows XP" item in the Hiren's Boot CD start menu. After the operating system boots up, you must click the "Start" button => "HBCD Menu".
In the HBCD menu that opens, select "Partition/Boot/MBR" => "Commandline" => "MBRFix":

To restore the windows boot record (MBR) and the windows bootloader on the C:\ drive for windows 7, the command parameters should be: MBRFix.exe /drive 0 fixmbr /win7 /yes. To view disk information, you can enter the command:
MBRFix.exe /drive 0 driveinfo.
I have not yet tested this utility on windows 8 and windows 8.1, so I cannot recommend it.
nastroisam.ru
Master Boot Record (MBR) recovery in windows 7
After the channel "Video Tips" was told about easy way installing two or more operating systems on one computer, reasonable questions arose about what would happen if the second system got tired and there was a desire to remove it. Most likely, the bootloader will fly off (in the language of motorists, it's like a starter in a car) and you will see a black screen. Many may think "well, that's it, the computer has broken down again." In fact, the system is installed and fully functional, but it cannot start.
It can also happen if you install systems on a computer in a chaotic manner and do not follow the correct installation order: (C:) windows XP, (D:) windows 7, (E:) windows 8.1 (F:) windows 10.
In a word, the "loader" can "fly" for various and more exotic reasons, but you should not be afraid of this.
- The Master Boot Record (MBR) is the first sector on the hard disk, which contains the partition table and a small bootloader program that reads data in this table from which partition of the hard disk the system boots and then the information is transferred to the partition with the installed operating system, for downloading it (something like that 🙂).
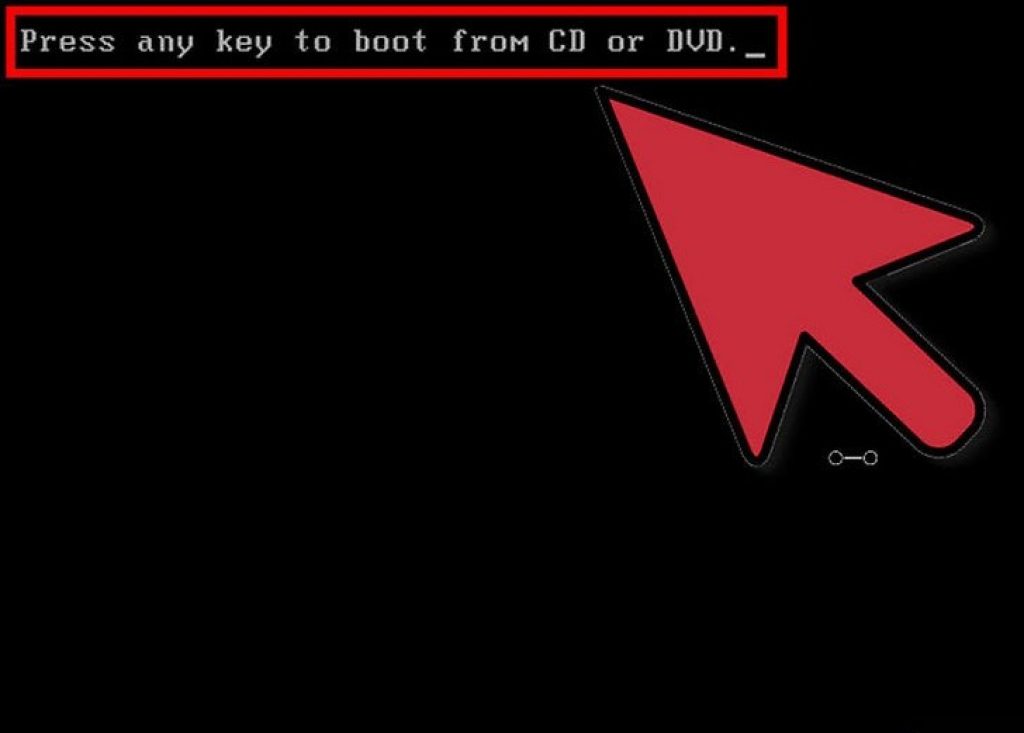
Today the conversation will be about windows 7 (although the steps to restore the "bootloader" in other systems are the same). To do this, you need either an installation disk with the operating system, I hope you haven’t thrown it away yet, or a flash drive (if you don’t have either, read the article below). We turn on the computer. We press the button responsible for entering the boot menu and set the boot priority from the drive or from the USB drive. Imagine that we are booting from an optical disc. An inscription appears during the download.
1. Press any key to boot from CD or DVD. We reach the "Install windows" window and click the "System Restore" button.

Probably problems will be detected immediately. Click the "Fix and restart" button.

2. If it doesn’t help and the system still does not boot, we again reach the “System Recovery Options” window and click the “Next” button.

Select "Command Prompt".

Enter the first bootrec /fixmbr command
- The utility writes a windows 7 compatible Master Boot Record (MBR) to the system partition. This option will solve problems associated with damage to the master boot record, or if desired, remove non-standard code from it. The existing partition table is not overwritten in this case.
The second bootrec /fixboot command
- The utility writes a new boot sector compatible with windows 7 to the system partition.

We exit by writing exit and reboot the computer.
3. In principle, these actions should "cure" the computer. But there are still commands if the dark clouds continue to gather overhead. We enter the bootrec /ScanOs command, the hard drive is scanned for operating systems, and if any are found, a corresponding warning will be issued. Then the bootrec / RebuildBcd command, this utility will offer to add the found windows to the boot menu, agree and enter Y and press Enter. windows was successfully added to the boot menu.
4. In addition to the methods described, you can use the bootsect /NT60 SYS command, the main boot code will also be updated. Then exit and reboot.
5. If nothing further helps (although it is hard to believe), we restore the boot environment using the BCDBoot.exe utility, it is used to create a system partition or restore the boot environment located in the system partition. The command line looks like this: bcdboot c:\windows If your system is installed on another partition, you need to correct the path in the command, for example, to bcdboot e:\windows
Thus, we have successfully restored the "bootloader" in windows 7 and there is no need to drag the computer to the workshop. What if there is no installation disk or flash drive. Download at least this program in advance. Upload it to a disc or USB stick. By the way, remember we already had a post on how to create a multiboot flash drive. When it happens to see a black screen, we remember this program, there are a lot of interesting things, including the cmd.exe command line interpreter.
This is probably enough, although the inability to start the windows 7 operating system due to a damaged or missing bootloader can be solved using programs such as Hiren's Boot CD, Paragon Hard Disk Manager, MBRFix and many other useful gizmos 🙂.
Help the victim of the capitalist cataclysm. Share the post on social media networks:
oleglav.com Device drivers not found when installing windows 7 
How to disable user account control in windows 7
One of the effective troubleshooting steps related to windows boot is to repair Windows 10/7/8.1 boot record with new UEFI and GPT partitioning or BIOS with MBR partitioning. One of the common reasons why the master boot record can get corrupted is due to malware infection or file corruption in that sector. Improper shutdown can also lead to boot record (MBR) corruption. Sometimes problems happen when Linux Grub is installed and Windows cannot detect it. In some cases you may get an error Bootmgr is Missing or BCD when you turn on your computer. In such cases, you can run bootloader repair to fix these issues.
How to repair Windows 10 bootloader
You must prepare, since the computer does not boot to your desktop and additional boot options may not be effective. Therefore, you need Windows 10 with the same bit depth (x32 or x64) that you are going to fix, and preferably the same version. You must boot in all of the methods below from a bootable flash drive in order to run the command prompt. Remember that after restoring the bootloader, some errors may appear and you just need to restart the PC a couple of timesto get used to the bootloader.
Start installing Windows 10 from a bootable USB flash drive and go to the installation point. Next click on " System Restore" to get into advanced boot options.
Method 1. Once you're in Advanced Boot Options, go to " " > "Extra options" > and select "". Wait for the process to finish and the Windows 10 bootloader should recover.

Method 2. In the same advanced boot options go to " Troubleshooting" > "Extra options" > and run " Command line".

To begin with, we will make sure on which local disk the system in which we want to restore the bootloader is located. To do this, run the following three commands on the command line, pressing Enter after each one:
- diskpart
- list volume- displays a list of partitions.
- exit- Exits the Disk Tool.
In my case, the screenshot below shows that the local drive on which Windows 10 is installed is not "C", but "D". You will most likely have "C", but be careful, you must determine where you have the system installed. Once you have determined under which letter your system is, then enter the following command to restore the Windows 10 bootloader:
- bcdboot D:\windows

Method 3. If you are using a Windows system with the new UEFI and GPT partition scheme, then you need to find a hidden partition with the FAT32 file system (it is about 90-300 MB). If you have a BIOS and MBR partition, then the file system will be NTFS (about 500 MB). In my case it is NTFS. So, we launch the command line through a bootable USB flash drive, as described above, and write commands:
- diskpart- starts the tool for working with disks.
- list volume- displays a list of partitions.
- select volume 3- Choice hidden volumes (in my case it's NTFS, you might have FAT32 hidden).
- format fs=ntfs or format fs=fat32- formatting the selected volume (depending on what you have).
- assign letter=E- Assign a new letter to that (I assigned what was already there).
- exit- exit from the discpart tool.
- bcdboot D:\Windows /s E: /f ALL- copy the bootloader files. (In my case, the D: drive is the volume on which Windows itself is located, E: is the letter that we assigned to the hidden partition).
- diskpart- launches back the tool for working with disks.
- list volume- display the list of sections.
- select volume 3- The number of the hidden volume to which we assigned a letter.
- remove letter=E- remove the letter so that the partition is not displayed in the system when we reboot.


Method 4. In this method, we use the tool bootrec.exe. Enter the following commands one after the other into the command line:
- bootrec /RebuildBcd
- bootrec /fixMbr
- bootrec /fixboot
Exit and reboot your system.

In some cases, you will need to run an additional command:
- bootsect /nt60sys or bootsect /nt60 ALL

After installing several operating systems on a computer, for example, Vista and Windows 7, the initial boot menu settings are lost, leading to the fact that every time you start the PC you have to choose which OS to boot from and which parameters to apply. The process, let's say, is unpleasant, since it takes a lot of time. In this case, restoring the original appearance of the boot menu by editing the system startup order in the Windows bootloader will help to return the situation to its course. However, it can be done in more than one way.
Option #1: Debugging via the "System" Control Panel
In order to start the process of restoring settings and remove additional boot options from the Windows bootloader using this method, you first need to enter the "System" section. You can do this in different ways:

In any case, the "System" window will be displayed on the screen. In it we find and select the "Advanced system settings" section, and then click in the system window that appears opposite the "Startup and recovery" tab, the "Settings" button:

As a result, users are given the opportunity to:
- change the order of startup of operating systems by selecting the OS that is loaded by default;
- determine the waiting time (timeout) before starting the system;
- remove the list of available OSes in the boot menu:

Perhaps it is easy to see that the advantage of this method is the simplicity and speed of solving the problem with editing the boot menu. However, it would hardly be logical to deny that it can only determine the most basic Windows startup parameters.
Option #2: Configuring with the System Configuration Utility
It is also possible to remove unnecessary variants of operating systems installed on the computer from the Windows bootloader by editing the settings in the System Configuration utility. You can open it in different ways:
One way or another, after the system window "System Configuration" appears on the monitor screen, to restore the standard method of starting Windows, you will need to enter the "Download" section. Here, in particular, you can make settings such as:
- remove an extra entry from the Windows bootloader;
- assign one OS to run by default;
- set a timeout at system startup;
- set maximum memory, number of executable processes, PCI lock:

Thanks to the simple and understandable interface of the utility, the process of performing each of these actions is not difficult. For example, in order to remove an unnecessary OS from the start menu, just click on it with the mouse and click the "Delete" button. Accordingly, in the “Timeout” section, the system start delay time is set, and so on.
Option #3: Restoring default settings via the bcdedit.exe command
The process on the OS computer can also be started by working in the bcdedit.exe utility. It is located in the Windows\System32 folder, but you can only run it with administrator rights through the command line.
To do this, the easiest way, of course, is to use the search bar available in the Start menu. In this case, the procedure will be as follows:
- enter the "Start" and set the search word cmd;
- right-click on the displayed result in the list of programs and define for it "Run as administrator":

After the “Command Prompt” opens, first of all, you should take care of saving a backup copy of the bootloader for later access to quick data recovery. To do this, create the BCDREZ folder on drive C, and then type bcdedit /export C:\BCDREZ\bcd into the command line and press Enter. In the future, to cancel all changes and restore the basic settings, it will be enough to use the bcdedit /import C:\BCDREZ\bcd command.