2 hard drives on one computer. Additional hard drive how to install
Good day to all, my dear friends. Today I want to tell you about how to connect a hard drive via usb to a computer or laptop. Personally, I had such a question when I replaced it on my laptop, after which the old “hard” remained restless, although completely serviceable. Therefore, I hasten to please you. If you have such a device, then you can make an excellent mobile data storage out of it.
True, there is one small condition. These methods are suitable only for more or less modern hard drives with an interface not lower than SATA.
USB Box (containers, pockets)
Cam Box - This is (as you understand) a kind of box (plastic or metal), inside of which there is a special slot for a particular disk. Naturally, it should be noted that there are boxes for both large HDDs (3.5) and small ones (2.5) that go under laptops.

The HDD is inserted into the box simply elementarily, and after assembly it will not differ in any way from the usual external hard drive. After that, you just need to insert a USB cable into it and connect it to your computer. Thus, you get a double benefit:
- You bring an old device back to life and use it;
- You practically get an external HDD for free
On such media, you can store any backup and archive copies, or use it in everyday life.
All the pleasure will cost you an average of 300-500 rubles.
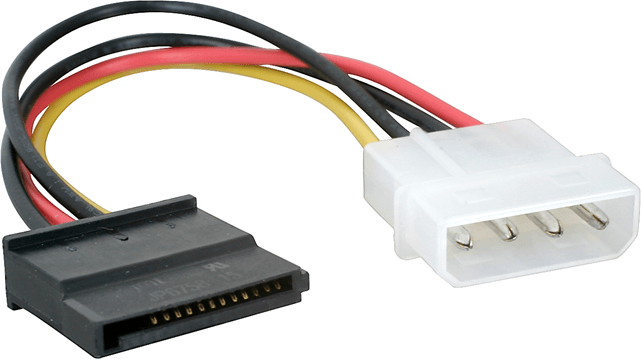
Adapter (SATA-USB)
The easiest and least expensive way is to purchase a special SATA-USB adapter. The adapter itself is a cable, at one end of which there is a connector for connecting a disk, and at the other end USB port.

Well, I think that you guessed what you need to do in this case. Yes, it's simple. Connect HDD to the connector, and insert the other end into the usb-port of your computer or laptop.
But just keep in mind that conventional HDD (3.5) may not have enough power from one USB cable, so purchase a cable with two connectors and use them at the same time.

Depending on the company and product quality, such cables will cost you about 200-600 rubles.
Dock station
The most expensive but very effective option is to purchase a docking station. These devices are somewhat reminiscent of old consoles such as Dendy or Sega. The similarity lies in the fact that instead of a connector for cartridges, there are connectors for HDD. You just have to simply insert a hard drive into this station, and then connect it via USB to your computer.

Such devices come in different types, and in many cases you can work not only with one disk, but with several at once, and even of different form factors (2.5 and 3.5).
The cheapest options with one device will cost you no less than 1000 rubles, or even more. More powerful stations cost both 3 and 4 thousand rubles.
As you can see, there are enough ways to connect a hard drive via usb to a computer, and for every taste and color. So you no longer have to leave all your devices restless.
Well, this concludes my article. I hope you enjoyed it, so don't forget to subscribe to my blog updates and share blog articles in in social networks. Good luck to you. Bye Bye!
Sincerely, Dmitry Kostin
Every year the amount of information stored on the computer increases. As a result, the computer starts to boot for a long time and periodically freezes. And this is natural, because all data is stored on a hard disk, the memory of which is limited.
Users solve this problem in different ways. Someone transfers information to various media, someone turns to the master and asks to increase the computer's memory, and someone decides to connect a second hard drive to the computer. Therefore, let's figure out how, without the help of a specialist - on our own - to connect a second hard drive to a computer.
To get started, you need to completely de-energize system unit : disconnect all cables and power cable. Now you need unscrew the side covers sistemnik. We unfold it with the back towards us and unscrew the four screws on the sides. Slightly pressing on the side parts, move them in the direction of the arrow and remove.
Hard drives in the system unit are installed in special bays or cells. Such bays can be located in the back of the system unit at the bottom or in the middle, some hard drives are installed turned on their side. If your system unit has several cells for hard drives, install the second not right next to the first - this will improve its cooling.
Depending on how you connect to motherboard internal hard drives are divided into two types: with IDE and SATA interface. IDE is an older standard, now all system units are designed to connect hard drives with a SATA interface. It is not difficult to distinguish between them: IDE has wide ports for connecting a hard drive and power supply and a wide cable, while SATA has both ports and the cable is much narrower.
Let's get down to business.
We will leave our first hard drive under the operating system, and we will connect the second one to store movies, games, music and other information. This configuration is not only convenient, but also increases the speed of the computer itself.
Consider the points on how to "get" to the installation site of our hard.
1. It is necessary to disconnect the computer from the mains.
2. Remove the cover of the system unit (if the cover is separate, then it must be removed from both sides).
3. Find your first hard drive (most often it is located closer to the end).


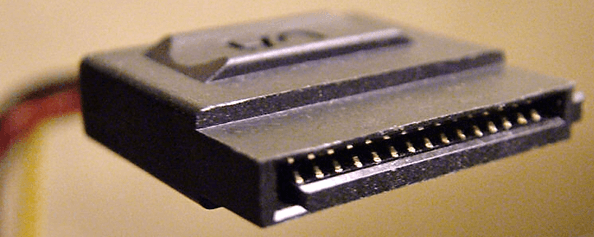
SATA power cable

This is what the SATA connector on the motherboard looks like for connecting a data cable.
For information:
If your motherboard has a SATA output, then it would be wiser to install this particular type of hard drive. SATA has more bandwidth than IDE. IDE is already harder to find in stores due to the fact that this interface is already out of active use, and it has been replaced by SATA, SATA-II, SATA-III (the larger the number, the higher the data exchange speed).
5. If your choice still fell on an IDE-type hard drive, then on the rear panel you need to rearrange the jumper to the Slave position. It is also necessary to check how the jumper is set on the first hard drive (it must be set to the Master position).

6. Now put your secondary hard drive back in place and connect to the motherboard and power it up.
7. Fasten the hard drives on both sides with the screws included in the kit.
8. Replace the system unit cover.
9. Connect the wires that were previously disconnected and apply power to it.
10. Turn on the computer, wait until it is fully loaded, then check if a new hard drive has appeared (to check, go to "My Computer")
11. If everything went well and the disk appeared in the computer, then you should format it before starting work.
Well, this is where the installation of the second hard drive is completed.
Hello! Please, tell a simple computer user to deal with hard drives and the possibility of their autonomous operation...
The point is the following. It became possible to install a second hard drive on your PC, so that the first one was exclusively for the OS + necessary programs + frequently used files and (documents, technical diagrams, etc.), and the second for home archive (video, photos, films, rarely used files.
I successfully installed the second hard drive myself (the OS sees and maintains it well) ... But there is one problem here. This hard drive should be used from time to time, but it turns out that every time the computer is turned on and off, the OS starts it anyway - and this, after all, affects the resource!
How to make sure that this, let's call it an "archival" hard drive, does not start up unnecessarily? Is it possible?
Nicholas | April 29, 2015, 08:40
" YUM wrote: as a matter of discussion: why not go mechanically? Well, for example, extend the power cord. Take dad / mom out and out of use, just open the pads. The cable, however, will stick out all the same in the "mom", but , I think, further than the show: "unknown device", Oska will not go ... "
In fact, it was this option that I considered first, and here's why. Now my system unit is (with the wide side) right behind the monitor and the back (free) side (for certain reasons) without a cover (i.e. there is free access to the hardware). Cables of both HDDs are easily accessible . In general, everything is predisposed to removing / inserting connectors. But realizing that everything would quickly become unusable, so I asked myself not a mechanical, but a software switch on and off of the hard drive. Well, it turned out that this, unfortunately, is impossible.
So, YUM, I'll have to follow the path already discussed...
YUM | April 19, 2015, 03:32 pm
in the order of discussion: why not go the mechanical way? Well, for example, lengthen the power cord. Take out dad / mom outside and as unnecessary, just open the pads. The train, however, will stick out all the same in "mother", but, I think, further than the show: " unknown device"Oska won't work. I remember sticking fans into the free blocks on the PSU. With outdoor use. One to blow - on me, the second - in the case. For, it happened, both of us overheated with the computer ... :-)
Nicholas | April 8, 2015, 13:58
Nick Nick, thanks for the reply. From the answers, I realized that the second hard drive integrated into the PC will still be polled by the OS for any of its actions. And therefore, in order to eliminate "unproductive" inclusions and disconnections, it is necessary to exclude it from the direction of one OS. That is, it is either a PC with two motherboards (and different OS), or a second PC, or an external hard drive, or a NAS ...
Nick Nick | April 7, 2015, 14:47
I did it this way, in the system unit there is a 500 gb disk divided into two partitions on one partition, the system on the other, downloaded movies, etc. In a beautiful plastic case called an external HDD box, there is a second (standing right on the table) hard drive also for 500. Moreover, it has an autonomous power supply switch on the case. There are photos and archives on it, and it is connected with a switch when needed, and when not needed, it is turned off by a switch on the body. It is connected to a USB computer (comes with a box included). The system sees the disk as a large flash. I took this box and watch photos and videos DVD or wherever there is USB.
Nicholas | April 7, 2015, 08:19
Nick, maybe you are right about something. But then again, I do not need a backup disk (did I name it correctly?), which will be stored in a cabinet.
There were 2 hard drives available (500 GB and 2 TB). On the first one, I placed the OS with accompanying programs (which are not yet installed all the necessary ones). By the way, as Dima Svinkin mentioned, the system disk was divided into two logical ones - for the OS itself and for different files needed in everyday work. And the second HDD (2 TB) is gradually filled with "house stuff" (photos, videos, films, music, rarely used documents, drawings, etc.).
As a result, after turning on the PC, after a while (as you mentioned, Nick) the "dvuhterrabyte" "falls asleep", I don't even know when this happens. On the one hand, this is good - the hard drive is not used, and on the other hand, the problem I describe arises.
Nick, I can’t buy an external drive yet (especially now they are very expensive, and there are already 2 TB available). It's just that I have the opportunity to get a small system unit - I'll probably have to "dance" from this option.
By the way, Nick, I'm certainly not an IT specialist, but all the same, everywhere it is said that the hard drive should be treated with care, including for him it's better to "spin" all day than to start and stop.
So, in summary, we can say the following:
1) separate management on one computer, with one OS, two physical hard drives (without good system knowledge and access to BIOS) is almost impossible.
2) to solve the problem I am describing, it is proposed to either physically turn off the second HDD (which is unrealistic), or use an external HDD, or you can use the second system unit of a small form factor.
Is everything right?
Nick | April 6, 2015, 22:47
For Nikolai: "professor" on one of the IT sites - advised you correctly. It is best to have 2 disks in the system. But they are used for something completely different. For example, only the system is on one disk. And if the system crashes or you need to restore it from a backup image six months ago, then your current documents will not be affected in any way, because. they are on a different drive. You won't lose anything. Or you need to check for errors or defragment the system disk - the operation will be performed much faster in time on a small system disk (where there is only a system) than on a huge shared disk, where in addition to the system there is a bunch of your documents, pictures, videos, etc. In short , 2 disks are used for data spacing - and this is necessary for the convenience of system maintenance.
I don't know what you are afraid of switching disks on and off. There is nothing to worry about, modern disks are designed for this, they can even turn off and fall asleep if they are not accessed for a long time.
Well, if you want to turn off the drive yourself, then buy an external drive. For example, I use an external USB-3 drive. It works quickly to turn it off - you just need to remove the connector with a cord from the computer's socket (it is inserted into the USB flash drive connector).
Nicholas | April 6, 2015, 20:54
Thanks to everyone who answered my question. A separate "curtsey" for Alek55sandr5 - it seems that you immediately "caught" the essence of the issue.
Now it becomes clear that if two (3.4) hard drives are connected to one OS (which the system "sees" as separate physical drives), then every time you turn it on, turn it off or reboot, the system will always start them all (which, of course, reduces their resource, because for a hard drive one of the most difficult modes is start-up, when the spindle spins "pancakes" Right?)
It is strange that at one time, some "professor" on one of the IT sites, "advised" to have two separate hard drives in his PC (and not in some kind of ride array, namely two separate physical ones - one for OS and related programs, and another for home video, photos, books, document archives and other relatively rarely used files). So I "bought" this "call".
That is, for me it will be the right decision: a separate small-sized system unit, from which to make something like a NAS and connect it as needed? This is the only way I can save the second hard drive from unnecessary inclusions. Correctly?
Dmitry | April 6, 2015, 10:59 am
Put there a swap file and a folder for temporary files. The disc will give back.
Svinkin Dima | April 5, 2015, 04:43 PM
Strongly disagree with you! A home archive must be created and stored on an external hard drive. What size is your system (physical disk)? For OS + various programs, 100-150 GB is usually enough, and for many users the system (logical) one is even several times smaller than these sizes. If you had one physical disk in your computer with a nominal size of 320 GB or more, then it is unreasonable to define this entire volume under OS + programs. It needs to be divided into two partitions (two logical drives) C:\ and D:\. Disk C is the system drive, and on drive D: \ you should place folders for temporary files of all programs, folders for downloading from the Internet, folders for saving files created in different programs and a temporary archive of the most popular files. Any extra physical device in a computer can turn into a headache at any time - this is a practice.
Alek55sandr5 | April 5, 2015, 15:50
As far as I know, unfortunately it is impossible to completely turn off the hard drive if it is connected to a PC. Each time you start the operating system, the hard drive will boot with it and its resource will slowly wear out. You can copy some files to this hard drive and remove the connected cables from its connector. Thus, it will be completely disabled and its resource will be larger. But of course, if this option suits you.
This is not entirely true. First you need to know what interfaces your devices have. If they are both SATA, then it is enough for you to connect them, you may have to set the order in the BIOS of the system accessing devices to boot from the disk on which you have the system installed, which is bootable for you. Otherwise, if the newly installed disk was previously installed operating system and it was active, then the download will go from it and most likely it will not work normally. If the disk is clean and the system accesses this disk first, then there will be no boot at all, the system will display the message No system disk. To manage this setting, you need to enter the BIOS. depends on whose BIOS you have installed (AWARD, American Megatrends Inc (AMI), General Software Inc, Microid Research, Phoenix Technologies) You can find out exactly what you have installed when you turn on the computer, the BIOS manufacturer will be indicated on the screen. In general, you will find out who the manufacturer is, write, we will tell you in which section to look.
If your drives are with IDE interfaces, then you need to deal with device connections. If both drives are connected to the same cable, then you need to figure out the correct setting of the jumpers on the drive, if they are not set correctly, the system may not see your drives at all, despite the fact that everything was in order before connecting. (it’s worth mentioning right away that you shouldn’t hang the HDD and CD / DVD Rom on the same cable. With this connection, the data transfer rate will be noticeably lower. The IDE channel itself will set the exchange rate on both channels not exceeding the exchange rate of the least high-speed device, i.e. CD/DVD Rom and your HDD will be slow.
Let's get back to the loop. There are 3 identical connectors on the cable. the farthest from the other two is inserted into the motherboard is System. The middle one is the Slave connector, the third one is the Master. Some cables have inscriptions near the connectors. On the disks themselves there is a picture that shows which connection corresponds to the position of the jumper. So, we insert the System connector into the motherboard, insert the Master connector into one of the disks and put the jumper in the Master position, connect the second disk to the Slave connector, for the Slave the jumper is usually not put at all, so in order not to lose it, we put it in the Cable select position. By the way, one hundred all connections should be made with the power off. There is a switch on the back of the system unit. We turn it off and press the POWER button (the one you turn on the computer), this will remove the residual voltage from the charged capacitors of the power supply. At the same time, the lights may even blink and the fans start to rotate. We connect the power connectors to your drives and turn on the power of the computer. Now you need to enter the BIOS and see if your drives are visible. If everything is connected correctly and the disks are working and the disk detection parameter is set to AUTO, then you will see information about them on the main page. Displayed as SATA interface channels as well as IDE channels. If it is not visible, then use the arrows to go to the channel in which None is written instead of the disk and press Enter. Then press Enter again and the system will try to find and recognize your disk. If not found, press Esc and go to the next channel and so on until all your disks are found. When you find it, you will see it for yourself. If not found, then check the connection, the reliability of the contact. If everything is determined, fine. We save the settings (usually the F10 key and pressing the Y key to confirm). Now let's try to boot the computer. If everything went as it should, great. If the disks were determined but the download did not go, then the matter is again in the order in which the devices are accessed. To tell you exactly what to do next, you again need to know the manufacturer of your BIOS.
Here, the information is through the roof for those who do not know anything at all about this yet. It may be difficult to perceive everything at once, but do it once, then do it with your eyes closed, there is nothing complicated about it. The main criteria is accuracy and attentiveness.
If you have Skype, please contact me, maybe I can explain better in words.
PS
Fuck Gee Gee.
They are the main source of information. In most cases, user data is stored on it. And every day the volume of this data is increasing. Therefore, it is not surprising that sooner or later all users are faced with the fact that free space is running out. There is only one way out of this situation, you need to buy and connect a second hard drive to your computer. In this article, we will try to help solve this problem.
Step #1: Power off your computer.
Before doing anything with the computer, it must be completely de-energized. Disconnect all cables from the system unit. Simply turning off the button on the power supply is not enough, all cables must be disconnected.
Step number 2. Remove the side covers of the system unit.

One hard drive will already be installed in one of the bays. This is your first hard drive, it contains your operating system and all your data. The second must be placed nearby. If the bay is designed for more than two drives, then it is advisable to place the second drive not right next to the first one. This will greatly improve its cooling.

Gently slide the hard drive into one of the installation locations. Please note that the drive must lie on small ledges and be fixed with four screws. If there is not enough space inside the system unit, then you may have to remove the video card or other components before installation. But, as a rule, this is not required.

After you have installed the hard drive in your computer, you need to fix it with four screws. Two screws are tightened on one side and two on the other. You should not save on screws, as this can cause unnecessary vibration and noise when the computer is running.
Step #4 Connect the second drive to the motherboard and power supply.
After the second drive is installed and securely fixed inside the computer, you can start connecting it. For using two cables, one goes to the motherboard, and the second to the power supply.
To connect to the motherboard, this is used (picture below). As a rule, it is red in color, so it is difficult to confuse it. One end of the cable needs to be plugged into the hard drive, and the other into the connector on the motherboard.

To connect to the power supply, a similar cable with a wider connector is used (picture below).
If your power supply is not equipped with a cable with such a connector, then you will need an adapter (picture below) from the old connector to the new one.
Step number 5. Close the system unit.
After you have connected the second hard drive to the computer, you can close the system unit. Install the side covers and fix them with screws. Once the covers are in place, you can turn on your computer. If you did everything correctly, then after loading the computer, a new drive will appear in the system.
The ability to connect additional hard drives will be very useful to you if there is not enough free disk space on the already installed ones. You can connect the HDD to a personal computer:
- Installed in the system unit using standard SATA connectors on the motherboard.
- By installing it in the system unit using the SAS connectors of the RAID controller.
- Using a USB-SATA adapter.
It is interesting! predecessorSATA was the interfaceATA (other name -IDE). The difference lies in the method of data transmission - serial transmissionSATA ParallelATA. It is generally accepted that serial transmission is faster, however, for the average user, the difference is imperceptible.
SATA
Step 1. Remove the case cover of your system unit.
Step 2 Connect the data cable to the connector on the motherboard.
On a note! The slot number is not important. The definition of a bootable hard drive is based on the software installed on it.

Step 3 Connect the data cable to the connector on the hard drive.

Step 4 Connect the power cable to the hard drive connector.

Important! When connecting the cable, the computer's power must be turned off. When connecting a cable with voltage applied to it, there is a high risk of damage to the hard disk controller, or the controllerSATA motherboard! In the event that your power supply has power connectors only for hard drivesIDE, use a special adapter.

Step 5 Secure the hard drive to the case with screws.

Important! Make sure that the cables do not come into contact with the fan blades of the system unit.
In the event that you are using a 2.5-inch drive, use a special sled to secure the hard drive inside the system unit more tightly.

Connecting a hard drive inside the case to the connectorsSAS
These connectors are backward compatible, that is, SATA can be connected to SAS, but SAS cannot be connected to SATA.
Step 1. Install the hard drive in a special construct (sled) of the appropriate size.
On a note! The designs are designed for certain form factors, that is, inserting a 2.5-inch drive into the controller basket of 3.5-inch hard drives will not work.

Step 2 Insert the sled into the controller basket and slide in until the sled handle locks into position.

Important! Don't forget to check the cable connectionRAID to the motherboard and change your controller settings.

Connecting a 3.5" Hard Drive Using an Externally Powered Adapter
Step 1. Attach the adapter to the hard drive.

Step 2 Connect the adapter to the desired port on your computer using the USB cable.

Step 3 Connect the power cable to the adapter.

Step 4 Apply power to the adapter by switching the toggle switch to the working position.

Step 5 If necessary, install drivers for the connected equipment.
Connecting a 2.5" Hard Drive Using a 3.5" Adapter
2.5" drives are commonly used in laptops. The connectors are no different from the 3.5 disk connectors, but the laptop hard drive is attached to the case using a special basket (sled).

Step 1. Remove the sled or other constructs from your hard drive.

Step 2 Follow the instructions for connecting a 3.5 hard drive with an adapter.
Connecting a 2.5" hard drive using the appropriate adapter
When using a special adapter for 2.5 hard drives, you do not need to remove the sled. As a rule, such adapters do not have an external power supply, and receive voltage from the computer's USB port.

Step 1. Connect the adapter to the hard drive.

Step 2 Plug both ends of the adapter's USB cable into ports on your computer.
Important! Two ends of the cable are needed because information is transmitted through one of them, and the adapter is powered through the second.
Video - How to connect a hard drive
Conclusion
We have considered three different ways connecting hard drives with SATA connectors to a personal computer. Each of them requires the purchase of additional equipment, at least loops. In the event that you decide to use a SATA drive as an external one (connected via a USB adapter), it is recommended to purchase a reliable protective case for the drive. When using the device, the cover should be removed to avoid overheating. Some parameters of hard disks working with different technologies are presented in the summary table.
| Name | Data transfer rate, Mb/s | Number of devices per port |
|---|---|---|
| IDE (ATA) | 133,5 | 2 |
| SATA R.1 | 150 | 1 |
| SATA R.2 | 300 | Up to 15 |
| SATA R.3 | 600 | Up to 16 |
| SAS R.150 | 150 | Up to 4 |
| SAS R.300 | 300 | Up to 4 |
| SAS R.600 | 600 | Up to 4 |
All sections of the site site
All problems with hard drives(screws) can be divided into two groups: incorrect connection (which, of course, is not a malfunction) and a malfunction of the device itself (failure of the electronics and / or the drives themselves).
It often happens that everything works fine until you connect a second hard drive. After that, the system "does not see" both disks or "does not see" the second disk.
Or you went to a friend with your hard drive (screw), everything worked fine for him, and when you came home, you found that the system “does not see” your drive.
These are all symptoms of a bad hard drive connection. There is nothing complicated in connecting a hard drive, so each user should know how hard drives are connected to a computer.
It's like being able to change a car tire. Do not call a tow truck if a tire is punctured.
HDD interface
For connecting a hard drive to a computer one of three interfaces can be used:
IDE (Integrated Device Electronics) - developed in 1986 and still in use today;
SCSI (Small Computer Systems Interface) - also developed in 1986 and is still in use today;
Serial ATA (Advanced Technology Attachment) - developed in 2003, is steadily gaining momentum.
In addition to these interfaces, ST and ESDI interfaces were previously used to connect hard drives, but the first was forgotten in 1989, and the second in 1991.
Initially, the IDE was developed only as an interface for connecting hard drives. Later it was modified and received the official name ATA - an extended interface for connecting drives.
The difference between ATA and IDE is that not only hard drives, but also CD / DVD drives can be connected to ATA.
The ATA interface has been constantly improved, and at the moment there are several of its varieties, designed in the form of standards (Table 4.1).
Table 4.1. ATA standards

Yes, the latest version of ATA was released in 2001. It seems that in the future the interface will not develop, but will peacefully live out its own. The next adopted standard, ATA-8 (2004), already describes SATAII, not IDE (ATA).
The SCSI interface is a high-performance interface for connecting various kinds of devices. Using this interface, not only drives, but peripheral devices can be connected to the computer.
For example, there are SCSI scanners that are much faster than scanners work connected to the parallel LPT port. But with the advent of the USB bus, there was no need to produce peripheral devices with a SCSI interface - USB is much more convenient.
Therefore, now the SCSI interface is used mainly on servers - ordinary users, as a rule, do not buy SCSI drives because of their high cost. And a motherboard with a SCSI controller is quite expensive (compared to conventional motherboards).
The SATA interface (Serial ATA, serial ATA) was developed in 2000, but it was not until 2003 that it first appeared in off-the-shelf systems. Compared to conventional ATA (sometimes referred to as PATA - Parallel ATA - Parallel ATA), it provides better performance. A lot also depends on what the real cache memory of hard drives is.
The ATA interface is described in the ATA-7 (in parallel with conventional ATA) and ATA-8 standards. The ATA-7 interface version supports 150 Mb/s, while ATA-8 supports 200 Mb/s. As you can see, even the very first version of SATA is faster than the most latest version PATA. And SATAII is even faster.
So far, 200 Mb / s is the limit for a home / office computer, that is, for a workstation. But the data transfer rate on the modern SCSI interface (Fast-320DT technology) is 640 Mb/s.
But such interfaces are used only on high-performance servers - most ordinary users cannot afford them, and there is no need for such speed.
Physical connection of the hard drive
As we know, there are two types of hard drives: ATA (IDE) and SATA (Serial ATA). The first disks are more “ancient”, but nevertheless there are second ones on sale - more modern, promising and faster.
Definitely - the future for SATA. It seems to me that in a few years ATA disks will be discontinued. I think so. Wait and see.
Attention! Any change in the physical configuration of hard drives and other disk drives requires turning off the power of the computer!
Connecting an ATA disk (IDE)
As a rule, the motherboard has two controllers for connecting IDE drives - primary and secondary. Two IDE devices can be connected to each controller. I don't specifically say "two hard drives" because CD/DVD drives can be connected to the IDE controller.
The first device connected to the controller is called the master. This is the master device, so you need to choose a faster device for the role of master.
The second device is called a slave. So, there can be four (maximum) IDE devices in the system:
primary master (primary master);
primary slave (primary slave);
secondary master (secondary master) - the second controller;
secondary slave - the second controller.
Open the computer cover. Typically, the first controller is labeled IDE0, and the second one is labeled IDE1 (that is, the numbering starts from zero). If you already have an IDE drive installed (because you might have bought a computer with a SATA drive), then it will be connected to the first controller.
How to distinguish an IDE connector from a SATA connector? It's very simple: the IDE connector is large (Fig. 4.3), and the SATA connector is small (Fig. 4.4).

Rice. 4.3. IDE connectors on the motherboard
Pay attention to the color of the IDE cable that connects the motherboard and the hard drive. If it is gray, then it is better to change it to yellow - these are higher-performance cables (your hard drive will work faster if you connect it with a yellow cable).
You can watch a visual video tutorial - the subtleties and nuances of
checking the hard drive in the HDD Scan program
The difference is that the old (gray) cables have 40 pins, and the new (yellow) cables have 80. When connecting the drive using the old cable, the BIOS warns that a 40-pin cable (40 pin) is used instead of an 80-pin one ( 80pin).

Rice. 4.4. SATA connectors
Connect one end of the IDE cable to the IDE connector on the motherboard (don't worry - you won't plug it in wrong, because the key won't allow it), and the other end to the hard drive.
And here the most interesting begins. You have connected the hard drive to one of the controllers, but now you need to select its mode - master or slave.
Next to the connector for connecting the IDE-cable on the hard drive there will be a connector for selecting the operating mode. The operating mode is selected using a jumper (Fig. 4.5), which must be set to one of the positions corresponding to one or another operating mode.
The map of hard drive operating modes is drawn on the hard drive itself - on the sticker on top. Sometimes the master is called DEVICE 0 (Figure 4.6) and the slave is called DEVICE 1. Don't let that confuse you.
Please note: Two masters or two slaves cannot be connected to the same controller. If a device is connected to the controller, you need to disconnect it and check the operating mode - if master, then connect the second device as a slave, or vice versa.

Rice. 4.5. Connecting an IDE device
It is undesirable to change the operating mode of already installed devices. Now I will explain why. Let's assume that a hard drive is connected to the first controller as a master - Windows boots from it.
If you install new hard drive as a master, and make the old one a slave, then the computer will try to boot Windows from a new hard drive and, of course, it will fail!
Usually there is a third mode of operation of an IDE device - cable selection (CABLE SELECT). In this mode, the device will be master or slave, depending on how it is connected to the loop - to the middle or to the end of the loop. You do not need to select this mode, otherwise the controller may have two masters or two slaves (if you connect them incorrectly).
So, we connected the IDE cable, selected the operating mode, it remains to connect the power. With this, everything is simple: a lot of power cables come out of the power supply, connect one of them to the hard drive. Do not be afraid - you will not connect it incorrectly. Usually, when you connect the power, the yellow wire is facing you.
General scheme connecting an IDE device (yes, devices, since CD / DVD drives are connected in the same way) is shown in fig. 4.5.
Why didn't we talk about the location of the device in the computer case? I remember that an acquaintance from America came and brought his computer with him, more precisely, one system unit.
It was the system unit of the so-called white assembly. When I opened it, I was pleasantly surprised - the length of all the wires was adjusted to a millimeter. There was an air intake from the fan to the processor, the second fan was directed to the IDE devices - for optimal cooling.
Our computers are the so-called yellow assembly. Although they are assembled from us, all components, including cases, are made in Taiwan (hence the name of the assembly - yellow).
And with Taiwanese cases, the situation is such that hard drives have to be placed not where you want or need in terms of cooling, but where they fit. I'm not talking about adjusting the length of the wires. I am silent about this...
Connecting a SATA hard drive
Now let's talk about SATA drives. Connecting a SATA drive is easy. But your motherboard must have a SATA connector (see Figure 4.4). All modern motherboards have it. Don't worry, you won't mix it up: the SATA cable cannot be connected to any other connector on the motherboard.
Connecting a SATA drive is easier than an IDE one:
SATA cable has two identical connectors - at the ends. One end connects to the motherboard, the other to the hard drive. It is impossible to connect the SATA connector incorrectly - the key will not allow;
The SATA drive has no jumpers (jumpers), so you do not need to select the device operating mode;
Only one drive can be connected to one SATA connector;
Jumpers on existing IDE devices have no effect on SATA drives;
After connecting the SATA cable, don't forget to power on the SATA drive. Please note: You need a special power cable (3.3V) that comes with the hard drive.
Sometimes an adapter is supplied that allows you to connect a regular power cable to a SATA drive (Fig. 4.7).

Rice. 4.7. SATA power cable with adapter (left) and SATA interface cable (right)
As you can see, the physical connection of a SATA drive is simple. If you want to install Windows on a SATA drive, then you need to make it bootable.
How? When the computer boots up, when you see the inscription, press DEL to enter SETUP, then among the settings of the SETUP program, find one called Boot Sequence or Boot Device Priority.
If you plan to visit it later... ( Connection order
hard drive to computer | Connecting a hard drive)


