How to recover a hard drive using HDD Regenerator. Restoring a hard drive using hdd regenerator Uvu use the hdd regenerator program
Unfortunately, nothing lasts forever, including computer hard drives. Over time, they may be subject to such a negative phenomenon as demagnetization, which contributes to the appearance of bad sectors, and hence loss of performance. If such problems exist, restore HDD In 60% of cases, according to the developers, the HDD Regenerator utility will help your computer. In addition, it is capable of creating bootable USB flash drives and performing some other actions. detailed instructions information on working with HDD Regenerator will be provided below.
Let's look at algorithms for performing basic tasks that can be implemented using HDD Regenerator.
S.M.A.R.T testing
Before you start restoring your hard drive, you need to make sure that the problem lies within it and not in some other element of the system. For these purposes, it is best to use S.M.A.R.T. technology, which is one of the most reliable hard drive self-diagnosis systems. The HDD Regenerator utility allows you to use this tool.

Hard drive recovery
Now let's look at the procedure for recovering a damaged computer hard drive.

Creating a bootable USB flash drive
Among other things, the HDD Regenerator application can create a bootable USB flash drive or disk, with which you can, for example, install Windows on your computer.

Creating a boot disk
Create in a similar way boot disk.

As you can see, despite the presence of a number of additional functions, the HDD Regenerator program is quite easy to use. Its interface is so intuitive that even the absence of the Russian language is not a big inconvenience.
This application is designed to restore damaged hard drives and other media. In the article we will look at what the software can do, highlight its strengths and weaknesses, and also offer a free download latest version HDD Regenerator 2017 from the official website.
Attention: there is no Russian version of the program; all attempts to find it will lead to downloading pirated software infected with malicious code.
What is the program for?
Let's figure out how the HDD Regenerator disk treatment program works and why it is needed at all. The fact is that a hard drive, hard drive or “screw” is one and the same device. It consists of a metal sealed housing in which a spindle (axis) rotates with one or more aluminum plates in the form of disks mounted on it.

It is on the surface of these disks, or more precisely, on the magnetic layer applied on top, that information is recorded. Sometimes, due to old age or manufacturing defects, some places in the magnetic layer lose their original properties and their magnetization. As a result, information is lost in such areas, and recording becomes impossible.
The essence of HDD Regenerator is to find such areas and transfer their coordinates to the operating room Windows system, in order for the latter to carry out reassigned sectors on the hard drive, hence its “treatment”. That is, now bytes of information will be written bypassing the “bad” sectors, as a result of which the disk volume will be slightly reduced, but the number of errors will also be greatly reduced.
The HDD Regenerator can also be used to diagnose digital media, for example, you can repair USB flash drives, memory cards, etc.
Video instruction
You can also see everything written in the article in the video that our author recorded for you. We recommend watching the video to the end and only then proceeding to download the software.
Installing HDD Regenerator
Consider installing HDD Regenerator on your computer or laptop. You can “treat” unstable sectors on your hard drive both from Windows OS and through PreOS mode, which allows you to perform a more in-depth analysis and completely correct all failures. We will consider all existing options below in detailed form. step by step instructions with pictures.
First of all, we will have to install the application on a computer or laptop. Then you can either start scanning, or write the program to external media and boot from it. However, first things first.
- Download the program using the button below and run the resulting installer.

- We are waiting for the application to be prepared for installation.

- The installation begins by clicking on the button labeled Next.

- We accept the application license by checking the box indicated by the number 1 and clicking Next.

- If necessary, change the installation path, then move on to the next step.

- We are waiting for the completion of copying all program files to their places.

- If the Launch the program checkbox is checked, then after clicking the Finish button the application will launch on its own.

This completes the installation of HDD Regenerator on a PC, and we move on to analyzing the options for launching it.
How to use HDD Regenerator
You can work with this software from Windows itself, as well as by downloading and installing it on external storage. The second option is much more preferable, since often when the OS is running, the disk is occupied by some processes and HDD Regenerator cannot access it.
The application can work not only with hard drives, but also memory cards, flash drives and even SSD drives.
Run from Windows Desktop
The first and easiest option for restoring a damaged disk is to run HDD Regenerator while Windows is running. We will look at it now:
- Click the Regeneration button in the main menu and select the item circled in red.

- Sometimes a warning may appear stating that the connection to your hard drive is not using a SATA port. If this is the case, you can try rebooting into the BIOS and selecting the desired interface there.

- The functionality of HDD Regenerator can also be accessed from the system tray operating system. To do this, simply right-click on the program icon.

- This is what the context menu looks like. Which contains a number of functions:
- Launching the shell of our application.
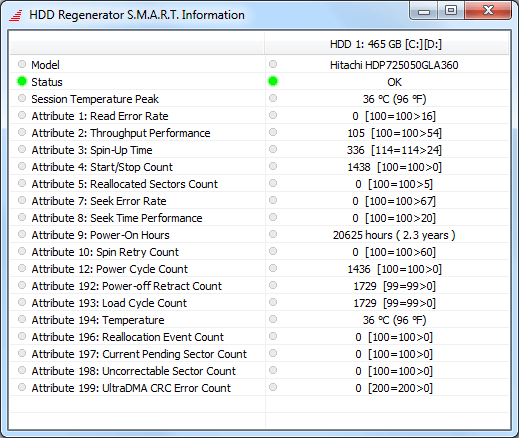
- Display S.M.A.R.T information.
- Turn notifications on or off.
- Exit the program.

This is what the S.M.A.R.T data on our hard drive looks like.

This is how application alerts are configured.

- To purchase the application, open the Full Version menu and select Serial Number.

The program is paid, but the functions provided free version, is quite enough for the average user, so there is no need to buy an HDD Regenerator.
- We continue our instructions. First, select the disk we will work with.

- Select one of the modes by entering the desired number and pressing Enter:

- Here we simply enter the number 1 and press Enter.

- We are waiting for the process to complete. The yellow rectangle displays the temperature of the hard drive, if, of course, it is equipped with an appropriate sensor.

Attention: when running the program in any mode, no user data will be affected.
- If we press Esc the process will pause and we will see the pause menu. Here are the following possibilities:
- continue scanning;
- display statistics;
- changing the start/end addresses of the check;
- change of operating mode;
- exit the program.

- The progress of verification and corrections is displayed as a white bar on a black square. In our case, no failures were found.

Sometimes this operating mode of HDD Regenerator does not work due to the fact that the disk is busy with some process. The option described below does not lead to such difficulties.
Using a flash drive
Let's look at how to record our application on external media and start scanning from it.
- Open HDD Regenerator, go to the Regeneration menu and select the option to create a bootable USB flash drive.

- We make sure that the desired media is displayed in the list, select it and click OK.

- We are warned that all data from the flash drive will be deleted. We agree and click OK.

- Next, a notification will appear indicating the successful completion of the process. Click on NO.

- We reboot the computer, then launch it from our boot drive and, indicating the number, select the disk we need.
You can read about how to set up the BIOS and start a PC from a removable device in the instructions for your computer.

- We select the scan mode, exactly as we did under Windows. In our case, this is the number 2.

- We start fixing bad sectors by entering the number 1 and pressing Enter.

- We start disk recovery using HDD Regenerator by specifying the number 1.

- The process of scanning and simultaneously fixing the HDD will begin. We are waiting for it to end.

- This is what the final result looks like. If you find bad sectors and you see the red “delays detected” message, the program will mark them and designate them as problematic. In our case everything is clean.

After this, the PC can be restarted.
Bootable CD/DVD
You can create optical bootable media in exactly the same way. This could be a CD or DVD. Select the desired menu item and, similar to the case described above, write the data to disk.

Advantages and disadvantages
To complete the picture, we suggest that you familiarize yourself with the positive and negative features of the program.
Advantages:
- ease of use;
- efficiency;
- ability to run from external media;
- good performance;
Flaws:
- lack of Russian language.
Thanks to our article, you will easily learn how to work with the program, and Russian localization simply will not be needed.
System requirements
For our application to work properly, you need a computer or laptop with the following minimum parameters:
- 1 GHz central processor;
- From 512 MB of RAM;
- Screen resolution from 640x480;
- The video card does not affect operation.
You can run the software on weaker configurations, however, there is no guarantee of correct operation in this case.
Similar programs
You can also restore the HDD surface using similar programs for disk repair:
- CrystalDiskInfo;
- Victoria HDD;
- HDDScan;
- MHDD;
- HDD Low Level Format Tool.
Download HDD Regenerator
You can download the latest version of the program we are considering using the button below.
Let's sum it up
Well friends, we will end here. If you have a question about working with HDD Regenerator, feel free to ask it in the comments, we will try to give a comprehensive answer as quickly as possible.
The HDD regenerator program is a powerful tool for restoring disks and their sectors. If you have tried simpler programs and they did not produce any results, then it’s time to turn to HDD regenerator. The utility works entirely in English. Of course, on the developer’s website there is a file “regenerator HDD rus”, but it only Russifies the start menu, which you will rarely see. Try diagnosing and repairing bad sectors hard drive in this program.
Go to the developer’s official website at http://www.dposoft.net and download the program installation file. Click on the “Download” link, select the save directory. Next, proceed to the process of unpacking the regenerator HDD, all text in the window will be in English. Just click on the “Next” button.


In the main window of regenerator HDD you will see three main links.
- “Bootable USB Flash” – creates a bootable memory card if you have only one hard drive on your computer and you have nowhere to install the program. Or, for personal convenience in carrying.
- “Bootable CD/DVD” – bootable optical disk.
- You need the top link, which begins with the words “Click here to repair...” this moment, it will run diagnostics.


- Prescan – diagnostics, after which you will see all the bad sectors.
- Scan with/without repair – a scan during which you can immediately run diagnostics.
- Assembly information.
Which item to choose depends on your goals and hard state disk. In order to see the full picture, it is better to choose Prescan.
Write the number 1 and press Enter.


If you know exactly which sector you need, then write 3.

In addition, it is prohibited to open programs on the hard drive being diagnosed.

In the menu that appears, you need the fourth item to change the option. Press 4 and Enter.


- Scan and repair bad sectors.
- Scan, but do not restore. You have already completed this step.
- Regenerate all sectors in a certain interval. To do this you need to know the interval bad sector s, it’s better not to select this item if you are not an experienced user.
To restore, press number 1.


Please note that the program only recovers one bad sector. To completely restore your hard drive, you need to purchase a licensed version of the program on the developer’s website. As a trial period, you receive one recovery procedure to evaluate the performance of the regenerator HDD.
This utility is an indispensable assistant for many computer repair services, since it does not mask the problem, like other programs, but corrects it. Other programs simply disable the “bad” sector, so you lose some of your disk space.

Hdd Regenerator is designed to restore sectors that are not working correctly. The developers claim that the program copes even with severe cases with a probability of more than 50%.
Principle Hdd works Regenerator
The program generates and alternately sends high and low level signals to the damaged sector of the hard disk. Thereby creating magnetization reversal of the disk. Most often, this helps restore sectors, because they become inoperative due to improper magnetization of the disk.
When using the program, system files and user folders are not affected. Thus, the information located on the restored disk will not be affected.
How to use Hdd Regenerator
To get started, you need to download the program. This does not require any financial resources - Hdd Regenerator is distributed absolutely free of charge.
The downloaded archive contains a “Read me” file, which must be used as instructions for installing the program. There is also a patch and crack here.
After installation, the Hdd Regenerator icon will appear on your desktop.
We launch the program by clicking on the icon.
A program window will appear on the screen asking you to start scanning your hard drive or disk.

Let's go straight to the recovery process: click the "Regeneration" button in the top tab bar, and then in the drop-down list - "Run process under Windows".

In the next window, select the hard drive to restore. It is visualized by numerical characteristics: capacity and number of sectors.
Click on the “Start” button, which is located in the middle of the active window.

After clicking the “Start” button, a window may pop up containing information about disk usage by programs running on the computer. To continue the process, you must close these programs or processes. If you see a window as shown below, then you need to click the “Retry” button.

Another variation of the message is shown below. In this case, click “Ok”.

After this, a window typical of DOS should appear on the screen.
It suggests four options for further actions with the hard drive:
1 Perform disk diagnostics and further restore it.
2 Perform diagnostics only and display the results at the end.
3 Restore specific sectors of the hard drive.

In the next window we indicate which sector to start the analysis from.

After selection, the program will scan your hard drive. At the end of the process, a window with the results will appear on the screen, where you can see: the number of damaged sectors, the number of corrected ones and sectors that cannot be restored.

As you can see, the recovery process using Hdd programs Regenerator takes little time and does not require special knowledge from the user. With the small weight of the program, which is only 8.8 Mb, it copes with its work quite successfully.
Devices designed to store various data are important components of any computerized system. Currently, magnetic hard disk drives (HDDs) are widely used. These devices are highly reliable, but, like any part of a personal computer, they are not immune to malfunctions and failures. In order to restore the operation of the HDD and provide this component with full service, there are many special programs.
Among them, HDD Regenerator took a worthy position. This is a very common and effective solution to a large number of hard drive problems.
HDD Regenerator: how to use
This application is very easy to learn and use. This software tool is designed to resuscitate damaged HDD sectors and restore the surface. Characteristic feature program is special principle of coating reversal, on the basis of which the software operates.
The application also has a nice interface and convenient controls - there are no complex add-ons or menus with a large number of levels, and the commands for activating certain options are understandable to any user. However the regenerator has many advantages and functions. We will not consider in detail all the advantages of the program, but will analyze only the main use cases that are most popular among computer users.
So, HDD Regenerator for hard drive recovery is often used in the following cases:

In addition to a wide “range” of options, the developers also included several activation options in this application, - The “regenerator” functions purely at the physical level, therefore it has no dependence on the version and type of OS. Installation, launch and use are possible in Windows environment, and when activating the program from a disk or flash drive - in DOS mode. This point should be discussed in more detail.
Launch methods
Windows

Launches from a flash drive
It is immediately worth noting that launching a program from a USB drive It is only advisable in a situation where the hard drive is severely damaged or is the only one. In addition, using a flash drive is also useful for those users who often repair different PCs. So, to make a bootable flash drive, you need to do the following:
- Launch the program and click on the “Bootable USB Flash” item.
- Choose specific device USB and click on “Ok”.
- After the bootable USB drive is created, restart your computer.
If you need to make a bootable disk, then in the program you should click the “Bootable DVD\CD” button and select the recommended burning (writing) speed in the window that appears.
How to use HDD Regenerator 2011
Detection of BAD-blocks

Scanning and troubleshooting
- Click on the item “Normal Scan...”.
- Next, click “Scan and repair”. This mode performs in-depth scanning and recovery of faulty units.
- The scanning range is determined using the arrow keys.
- After pressing the Enter key, the procedure itself begins.
- Blocks that have been successfully restored are highlighted with a green R.
- You can exit the application using any button on your PC.
Restoration using magnetization reversal technology
- Click on the “Normal Scan” item, and then on the “Regenerate all sectors in a range” button.
- Next you need to determine the range of blocks.
- The recovery is started using the C button on the computer keyboard.
As a conclusion, it is worth saying that the resuscitation of hard storage devices using HDD Regenerator is available to all computers user and does not require special knowledge. It should be remembered that any work related to software repair and maintenance of the HDD requires maximum care and attention. I hope that this HDD Regenerator manual will be useful to you.


