How to disassemble a model ws 3100 suspended fan. How to disassemble and lubricate the fan if it rumbles
Dust is the scourge of modern electronic devices: settling on mechanical parts, electronic circuit boards, etc., dust creates difficulties in the operation of equipment, which leads to its rapid wear and complete failure. As for portable computers, dust is the main reason for the decrease in performance, overheating of the device. How to clean a laptop from dust, and which parts of the equipment most need cleaning - read below.
Experienced users of electronic equipment have long known that cleaning and purging dust from equipment is a must to keep a laptop in working order. On average, a laptop should be cleaned of dust every six months. In some cases, more frequent cleaning is required. For example, if the program starts to “freeze” for no apparent reason. The frequency of cleaning depends on the number of dust collectors in the room, the quality of cleaning.

You will understand how often you need to clean your laptop as soon as you take apart the equipment: the amount of dust will tell you whether to increase or decrease the interval between cleanings.
Opening the equipment, however, is necessary only after the expiration of the warranty period. Otherwise, in case of breakdowns, you will be denied warranty repair of the laptop.
In order to clean the laptop from dust you need:
- Disconnect the device from the power supply and remove the battery. Depending on the model, it will be possible to remove the battery either by unscrewing the bolts or by pressing a special latch (for example, as on the Asus X51RL laptop). You can pry the latch both manually and with a screwdriver.
- Remove the back cover from the device. To do this, unscrew all the screws holding the cover from dismantling (do not forget about the bolts in the area battery). To do this, for example, as on an Asus laptop, you can use a Phillips screwdriver.
- Dismantle the keyboard (if the cooler is in the front of the laptop, for example, like Lenovo G780). In most modern laptops, the keyboard is held by special plastic locks. By pressing them, you can pry the keyboard with tweezers, turn off the cable, and dismantle it.
- Disconnect all cables (using a flat screwdriver), unscrew the bolts of the metal trim, and dismantle it.
You can clean the elements from dust with a vacuum cleaner at low power or with a brush with soft bristles. At the same time, special attention should be paid to the cooler and the outlet ventilation shafts in the case around it.
Don't forget about USB ports and CD-ROM devices: you can clean them with ear sticks or a can of compressed air.
At the same time, the flow should not be directed to the optical lens of the CD-ROM. The keyboard and laptop screen can be cleaned with a special damp cloth.
Cleaning the laptop cooler
The laptop cooling system, which is called active, consists of a fan, a heatsink and ventilation holes on the case. In order to clean the laptop cooling system, you need to get to its main element - the cooler. This can be done in two ways. So, for example, to get to the cooler of the Acer Aspire 5560G laptop, you will have to remove the keyboard, disconnect all cables, and open the upper, metal part of the laptop case. In some models (for example, Samsung NP350V5C laptop), the cooler is located under the motherboard. So, to clean the part, you will also have to remove it.

In most low-power models, such as the Lenovo G500, the cooler is located under back cover laptop.
To get to the element, it will be enough just to unscrew the bolts holding the back panel. Do not remove or disassemble the fan for cleaning. Additional cleaning equipment is also not needed: you can get by with improvised means.
So, you can clean the element of the laptop cooling system from dust with a construction paint brush, blow it out with a vacuum cleaner.
At the same time, the vacuum cleaner should not be in the “washing” mode. Hard deposits should be removed from the part with a hard-bristled brush. The ventilation shafts around the cooler can be cleaned with a toothpick.
How to disassemble a laptop cooler and when it is necessary
Disassembly of the laptop cooling system may be necessary if the cooler starts to work incorrectly (turns with effort), makes a lot of noise. This may be due to a foreign object getting into the fan, one or more fan blades are skewed, the system is heavily contaminated, a thread or hair is twisted on the fan, etc.

In order to disassemble the laptop cooler you need:
- Unscrew the bolts holding the top, protective panel of the panel element;
- Remove the metal panel;
- Remove the working blade with the motor from the plastic case of the cooler.
After that, it is necessary to assess the degree of damage. If the problem is mechanical - the blades are warped, then the fan will have to be replaced. In other cases, it will be enough to clean the part.
How to lubricate a laptop cooler and how to carry out the cleaning procedure
Over time, the cooler's factory lubrication can wear out and evaporate. To ensure the fan runs fast, it is necessary to lubricate the cooler from time to time. This can be done by disassembling the device. Ideal for lubrication is a special oil, which is sold in almost any computer store. But it's not always possible to get one.
For cooler lubrication, you can also choose machine oil for high-speed equipment, silicone grease.
At the same time, the grease should be slightly thicker than vaseline in consistency. You should not choose liquid oils, non-fluid grease lubricants for lubrication of the part: they will be pushed out of the part by centrifugal force.

To lubricate the cooler you need:
- Clear element. By lubricating a dusty part, you can achieve the opposite effect: grease with dust will turn into dirt, which will interfere with rotation and which will be difficult to remove.
- Remove the sticker from the central screw part of the cooler.
- Remove the rubber plug leading to the fan shaft.
- Take grease with a syringe and slowly pour it into the hole under the plug. At the same time, do not pour too much lubricant. approximate volume - half a cube.
- Turn the fan several times by hand so that the oil is well distributed over the part.
Install the cooler in the laptop case should be dry. Before installation, apply thermally conductive paste to the outer surface of the heatsink that abuts the processor. Tighten the bolts carefully, without overtightening them.
Instructions: how to clean a laptop fan from dust (video)
Cleaning and blowing dust off your laptop is an important step in keeping your laptop running properly. They are responsible for protecting the system from overheating. You can clean your laptop yourself. The main thing is to be patient and be careful. After all, the promotion of bolts and the dismantling of structural elements takes a lot of time and requires concentration. For the rest, the above instructions and tips will help you!
Recently, I quite often found myself in difficult, but similar situations. Their similarity lay in the fact that used things, partly working, partly faulty, constantly began to come across in my field of vision. In order to “create” something through their transformation and improvement, of course, first of all, it is necessary to bring them into the proper form, since there is usually a lot of dust and dirt, well, how could it be without it! So you have to take a brush, brush and go: with the help of a cologne wipe all kinds of hard-to-reach parts and mechanisms. But everything would be fine, but it just doesn’t happen so simply in the world of white. Especially for a long time to have to mess with coolers. If not for these coolers! Neither crawl, nor blow it properly with feeling, really, with arrangement, so to speak, because dust is “imprinted” in them. So how to be? The answer to this question is simple - Yandex and Google search engines. But, alas. I have not been able to find comprehensive information on this subject. So I decided to collect all kinds of coolers and write something like an article about them - accessible and simple, illustrating the disassembly of the "winged" with pictures. Maybe my article will close the topic coolers!
Fig 1. Here are some types of coolers

Fig 2. Stickers have been eliminated, but the Chinese do not put corks on everyone, that is, hack
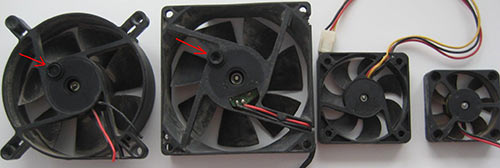
Fig 3. Corks are removed with needles, and in general, all disassembly is done using two needles.
By the way, do not throw away the stickers, as they will come in handy in due time - this way the mechanism is less susceptible to dust.

Fig 4.
Having removed the washer, we make sure that it does not inadvertently sink into oblivion, as it is made of plastic. Next, remove the rubber washer. Now quietly clean, rinse and lubricate. I use sewing machine oil for this purpose.
In the event of a breakdown of a household fan, both desktop and floor, do not rush to immediately take it for repair, let alone throw it away. Most likely, a simple problem has arisen, and you can repair the fan yourself.
A domestic fan does not differ in complexity of design, and the principle of its design can be seen in the figure below.
If you look closely at the figure, it becomes clear that an electric motor, a gearbox, a crank, a rotation speed switch and a propeller that creates an air flow can fail in the device.
The main difference between a desktop cooler and a floor cooler is the high stand in the floor version. The rest of the designs are identical.
So, the main malfunctions that you can observe in the cooler you purchased:
- the unit does not turn on, the power lamp does not light;
- the device does not work, but the light is on;
- cooler blades do not rotate well;
- the unit does not turn to the sides;
- the cooler makes a buzzing noise and does not rotate.
The unit does not turn on
In this situation, there may be 2 options: the light, indicating the readiness of the unit for operation, may light up or not. Depending on this, the breakdown diagnostic algorithm will be different.
Light bulb does not light
If, after turning on the device, the light located on its body does not light up and it does not start, then, first of all, you need to check whether there is socket voltage. This is done simply: take any electrical appliance and plug it into this outlet. If the device works, then you need to look for a malfunction in the electrical plug and cord.
To check the plug, unscrew it and check that the wires are securely connected to the terminals. To check the cable, you need to disconnect it from the terminal block of the device and “ring out” with a tester. If a break is found in the cable cores, it should be replaced.
The light bulb is on
The reason for this behavior of the unit, when the indicator light is on, but the fan does not work, and no sounds are heard, can be caused by breakage of the block with buttons. To check the buttons, you will need to disassemble the button block located on the stand of the floor fan or the stand of the desktop unit. But, before disassembling the device, make sure that it is unplugged from the outlet.
The operation of the buttons is very simple: there is an “on” and “off” position. It is necessary to check the “output” and “input” on each key using a tester.

If a faulty button is found, it cannot be repaired. Therefore, the switch should be replaced or the connection should be made directly. This approach to solving the problem will help to put the unit into operation if you are far from the store, for example, in the country.
Faulty speed switches can also be the reason why the fan does not turn on. To check the regulator, you will need to put it in the maximum position and check the “input” and “output” using the same tester.
Cooler blades don't rotate well
In the case when the fan does not pull and does not drive air well, you will need to disassemble the housing in which the motor is located. Sometimes the fact that the propeller is not spinning can indicate a lack of lubrication in the plain bearing installed in the electric motor.
Fan disassembly is as follows.

The fan does not turn sideways
How to fix a floor fan if it stops spinning (turning) around? It's all about crank whose fixing screws may loosen or come loose. To find out, you will need to disassemble the motor housing. If, during the operation of the unit, the rotation of the housing occurs with a delay or a complete stop, then you should check gears in the gearbox for engagement. It is also necessary to check the gearbox switch itself, namely, moving it up and down.
Disassemble the gearbox and remove the main gear. The shaft will also have to be pulled out. Apply grease to all moving parts and assemble the gearbox. If the gears are badly worn, they require replacement, although it is quite difficult to find analogues of broken parts for a fan. In this case, you will have to assemble the unit without a gearbox and use the cooler as usual, when the air masses move in one direction.
The cooler makes a buzzing sound and does not rotate
Cases when the fan does not spin, and at the same time the motor is buzzing, are quite common. There can be several reasons for this failure:
- lack of lubrication on the bearings (what to do, mentioned above);
- capacitor failure;
- motor malfunction.
Capacitor failure
Repair of a floor fan in this case is reduced to capacitor capacitance test using a tester. To get to the radio component, you will need to disassemble the motor housing. Detailed description how to disassemble the case was given above. After removing the casing, you will see the capacitor attached to the motor.


The presented device has a capacitor capacitance of 0.85 microfarads. For this reason, it is necessary to set the instrument to a value between 2 microfarads and 200 nanofarads, as shown in the figure below.

In this case, after connecting the capacitor to the device, it can be seen that its capacitance is 0.841 microfarads. If we take into account the error of ± 5%, then the capacitance of the radio component is within the normal range, and it is not the reason that the cooler stopped working.

Engine malfunction
When repairing a fan with your own hands, in search of a breakdown, it is also necessary to “ring out” the electric motor. If it is faulty, then the device will not turn on and will emit a buzz. It is necessary to measure the resistance two stator windings, having previously disconnected the wires going to them, as shown in the following figure.

As you can see, the resistance is also within the normal range, since its value is 1215 ohms (1.2 kOhm). Otherwise, the device will hum, but will not turn on. In such a situation, it will be necessary to rewind the engine in a special workshop.
The device is very noisy
Since the propeller of the unit, whose main task is to create an air flow, is made of plastic (not always of high quality), the probability of deformation of the latter is high. This usually happens if the unit is left for a long time in direct sunlight, or near a source of high temperature. When deformed, the balance between the blades is disturbed, which causes strong vibration and noise during normal air flow.
Also, the vibration of the shaft may appear due to the bushing of the plain bearing loosened from long-term operation.
Often when the apparatus falls, when the blades are spinning, protective grill is deformed. If a rotating propeller hits it, one of the blades may break.
Summing up, we can say that in different models of fans, the main components and control elements may look different. But the principles of diagnostics and troubleshooting do not change from this.
The most reliable fans of 2018
Table fan Mystery MSF-2428
Floor fan Stadler Form Q Fan Q-011/Q-012/Q-014
Floor fan Electrolux EFF-1000i
Floor fan Stadler Form Charly Fan Stand C-015
Floor fan Polaris PSF 40T
Almost any personal computer regularly requires cleaning and lubrication of the cooler - a special fan that serves to cool the processor or other important parts (power supply, video card, etc.). How difficult is this procedure? Can it be done at home? What should I pay attention to, and what may be needed when cleaning and lubricating fans? We will talk about all this and much more in this article.
First you need to understand what is best in a computer. The first thing that comes to mind is oil. Naturally, not vegetable, not olive and not animal! After all, if you use such a lubricant, you can completely ruin the cooler. Dust and dirt will simply begin to stick to it intensely.
- Machine oils (i.e. motor oils - synthetic, semi-synthetic);
- Lubricating oils for sewing machines and various electrical equipment;
- High performance bearing greases;
- Special silicone lubricants.

Do not use those lubricants that are prone to thickening. These are grease, cyatim, lithol, etc. Is WD-40 suitable? Again, no. This lubrication option from an American manufacturer is intended only for the treatment of those surfaces that are rarely in motion. For example, a door hinge. Whereas the cooler works constantly and at high speeds.
In addition, on various forums, many users recommend using graphite grease to lubricate PC coolers. However, the opinion of experts on this matter is different. You will do more harm than good with it. Firstly, it conducts current well, which can cause a short circuit. Secondly, graphite grease is designed to lubricate heavily loaded mechanisms that operate at moderate speeds.

However, the cooler is a highly resourceful device. For example, even the simplest and smallest fan of a weak intel or amd processor can rotate at a speed of 1000-1500 rpm. What can we say about expensive and powerful cooler models from such manufacturers as deepcool, zalman, coolermaster, etc.
Therefore, graphite grease cannot be used. Because of it, the fan speed will definitely decrease, bearing wear will increase, etc.
What is important to know about a computer fan?
Many are equipped with several fans at once. As a rule, there are three of them. These are coolers designed to cool the computer's power supply, processor and video card. All of them are extremely important for the stable operation of the system. If even one fails, then there can be big problems due to overheating of the PC.
What then to do? It's simple - carefully monitor whether the computer is heating up, whether it makes strange sounds, whether there are additional noises during its operation. Each of the items listed is a clear symptom that indicates the need to lubricate the PC fan.

Why does a computer cooler periodically require additional lubrication? It's all about its design. As a rule, the device works due to plain or rolling bearings having a special shaft. It rotates inside a bushing or cylinder, where there is a lubricant that creates a special oily film. Gradually, it evaporates or becomes contaminated, and this leads to the fact that the metal parts begin to come into contact with each other. As a result, noise appears, the fan runs much slower and the computer heats up.

How to lubricate the fan (cooler) of the processor?
So, you have already understood that the cooler does not make noise, and various parts of the computer do not heat up, it must be cleaned and lubricated. To do this, we offer you the following scheme of actions:
- First of all, we disassemble the case of the system unit in order to gain access to the coolers.
- Usually the easiest way is to remove the CPU fan, as it is located in a prominent place. So let's start with it. You will need a screwdriver to unscrew the bolts and remove the cooler.
- Along with the processor fan, we remove the heatsink. Separate each from each other and thoroughly clean. You can use a vacuum cleaner. Then with cotton swabs soaked in alcohol (cologne or vodka). It is advisable to clean all edges, parts and accessible surfaces.
- If you have thermal paste, then it's a good idea to treat the places where the radiator and processor come into contact with it. True, do not forget to first remove the old paste with alcohol.
- Then we collect everything back. Now let's move on to the lubrication procedure. To do this, remove the special sticker located in the center on the processor cooler. Next, you need to pull out a small rubber plug (for example, using tweezers or a screwdriver). Be extremely careful.
- Under the rubber band you will find a bushing and an axle. Using a match, toothpick or cotton swab, remove the old grease.
- Then you can start lubrication. Just put some oil on the fan shaft. When doing this, remember that there is no need for a large amount of lubricant. After all, when applying a rubber stopper, all the excess will be squeezed out. In addition, because of this, the case may get dirty, and it will be difficult to stick the protective sticker back on.
- As you already understood, the final stage is the return of the rubber cork to its place. At the same time, care must be taken that the lubricant does not come out. Then we wipe the cooler case and proceed to the sticker. If it is very worn out, then it can be replaced with an ordinary piece of adhesive tape. Just don't forget to remove all excess adhesive tape, otherwise, because of the working cooler, they will rustle and make additional noise.

You can also lubricate the internal parts of the fan. But it's quite difficult. And you have to completely disassemble the cooler. Therefore, take on such work only if you are confident in your abilities and have some experience. Otherwise, you can easily ruin the cooler.
How to lubricate the cooler of a video card or power supply?
The process of lubricating and cleaning a graphics card cooler or power supply is often a little more difficult than a processor. This is usually due to the fact that you have to disassemble the case and unscrew more bolts. Otherwise, the lubrication point cannot be accessed.
Also, coolers for video cards and power supplies are not always the same. For some, the lubrication point is on top (just under the sealing sticker), for others, you need to remove the radiator, disconnect the fan, and then only move on to cleaning and lubricating. In all other respects, the procedure is similar to working with a processor fan.

What to do with a non-separable cooler?
Often modern computers are equipped with non-separable coolers. And most often they can be found on some nvidia geforce video cards. Lubrication of such fans is much more difficult. After all, there will not be a special rubber plug, removing which you get access to the sleeve. Of course, someone, pardon the pun, manages to disassemble a non-separable cooler. However, most often this ends with a breakdown of fasteners and other parts.

A less risky option is to make a hole in the center of the axle to fill in the grease. To do this, you can use a drill or a hot needle. If you still decide to disassemble the cooler, then for many models you will have to make several holes at once in order to cut off the latches holding the bearing sleeve.
But such a non-separable fan can also come across, where the impeller is easily removed with a flat screwdriver. Then the procedure for cleaning and lubricating it will not cause any difficulties.
I found a couple of old fans in my pieces of iron and decided to take them apart to see how they work. In addition, it has never been possible to disassemble such fans completely before. All the time was limited to the usual peeling off the sticker, removing the cork and adding a couple of drops of oil to the bearing. Both of these fans are from two different power supplies, one 120mm, the other 80mm. But exactly the same ones are attached to the case of the system unit, for pumping cold air into it or for pumping out hot air. So using these as an example, you can carry out preventive maintenance for your fans.


I thought about reviewing both fans, after all, the small fan is about 15 years old, but later it turned out that they have almost the same design. The differences are noticeable only in the size and shape of the housing, impeller and motor board. Therefore, I will describe the disassembly process on a large fan (120mm).
First, peel off the sticker, under which the rubber stopper is hidden.


With a screwdriver or something sharp, pick it up and take out the cork.

Under the cork, you can see the metal axis of the impeller, on which a split, white, plastic lock washer is dressed. If it is hard to see due to old grease, then wipe it with a cotton swab.

We insert a narrow screwdriver into the cut of the retaining ring and turn it 90 degrees so that the ring moves apart. Then pry off the ring with a screwdriver and remove it from the impeller axis. During this process, the puck can easily shoot and roll off somewhere, usually in the most inaccessible place, under a table, sofa, baseboard, etc.


After removing the retaining ring, remove the rubber ring from the axle.


Now, without much effort, you can separate the impeller from the frame, while it will be slightly held by the magnets that are mounted in the impeller housing.


We remove another rubber ring from the base of the impeller axis.


On this we can say that the disassembly is completed. We clean everything from dust and old grease.


Actually, the frame itself with the engine.


We also carefully clean the brass sleeve of the engine from dirt and old grease. If you wish, you can remove the board with the motor windings, although this is not necessary for cleaning and lubrication. In my case, it was easily removed from both fans, but I found traces of glue under the board. So you might not be able to pull it off that easily.


We collect everything in reverse order. Rubber rings on the bottom and top.


It is convenient to upset the retaining ring with tweezers from both sides at once.

If your fan is very worn out (noisy, knocking, rattling during operation), then it is better to immediately replace such a fan with a new one. Otherwise, lubricate the impeller shaft with grease (solid oil, etc.) before installing it on the engine. This fan is relatively new for me, so I assembled it, and only then lubricated it with engine oil because it is liquid and will always fill all the cracks.

We supply oil with a needle to the rings and the axis of the impeller, the syringe is indispensable in this regard. In this case, the impeller can be rotated periodically by hand, then it will be easier for the oil to penetrate inside. You should not pour a lot of oil (3-5 drops are enough), since everything superfluous will always find a hole and subsequently will collect dust on itself and grow moss or scatter from the blades around system unit. Here, of course, everything depends on the size of the fan, a large one needs more lubrication, but a small one needs less, respectively.

We close the plug. If this sticker area is accidentally flooded with oil, then you need to wipe it with a solvent or white spirit, since this sticker will no longer stick to the oil. The sticker itself can be replaced with adhesive tape if the old one has become unusable.


Basically, it's all about prevention. We connect, check, then, depending on the test results, we install it in a computer case or power supply. Or we throw it away and go to the store for a new fan, if during disassembly we completely staggered our old fan. Fan designs are different, both on plain bearings, as in my case, and on rolling bearings (ball bearings), but I think they have a similar general disassembly principle.
Afterword
Recently I came across such a Gembird fan with a diameter of 120mm. He attracted my attention with the inscription BALL on a protective sticker, which translates like a ball, ball, ball. After disassembly, it turned out that this fan is assembled just on a ball bearing. But disassembling it is practically no different from disassembling a cheap fan, which I disassembled a little higher in this thread.


Even the bearing itself in this fan is perfectly disassembled with a pin. It is only necessary to carefully remove the retaining ring with a needle, then you can remove the side protective wall of the bearing (anther). After that, you can safely engage in the prevention of the separator and the bearing as a whole, clean, wash, change the lubricant. In this case, the bearing is almost perfect, there is a lot of lubricant, and besides, it is light. If your bearing is dry and dirty, and besides, there is wear (the clips dangle as if the balls have become smaller), then it is better to change such a bearing to a new one. Although it is easier and maybe cheaper to buy a new fan.